Imagine this: The power goes out. Maybe it’s a big storm, just a local issue. You hop in your car, ready to head out, but your garage door won’t open. Stuck! This frustrating scenario is exactly why your Liftmaster garage door opener likely has a backup battery. It’s designed to save you when the main power fails.
That little battery inside your opener unit is a vital part of your garage door system. It provides emergency power, so you can still get your car out or secure your home when the lights are off. Over time, though, this garage door opener battery will lose its charge and need replacement.
Knowing how to perform a Liftmaster garage door opener battery replacement is a straightforward skill. It’s an important piece of garage door maintenance. Changing the battery helps ensure your garage door system is reliable. It gives you access when you need it most, even during a power outage. In this guide, you’ll learn how to replace the battery in your Liftmaster opener, step by step.
Why Does Your Liftmaster Need a Backup Battery?
Think about how much we rely on our garage doors. They’re the primary entry point for many homes. That’s why the battery backup in Liftmaster openers is such a smart feature. It’s not just a convenience; it’s a lifeline during a power outage. Without it, your heavy garage door becomes, well, very heavy!
A failing battery means you lose this crucial emergency access. You could be stuck inside your garage with your car, or worse, stuck outside. It completely disrupts your plans. The battery backup in Liftmaster models is there precisely to prevent you from being inconvenienced or stranded when the main power supply is cut off.
Often, a failing battery will give you a heads-up. You’ll likely hear a beeping sound coming from the opener unit itself. This is your opener’s way of telling you, “Hey, my backup battery isn’t holding a charge anymore!” Ignoring this sound means risking being powerless the next time you lose electricity.
Replacing the garage door opener battery ensures you maintain that emergency access. It provides the reliable performance and peace of mind you expect from your garage door system.
Is Your Liftmaster Beeping? Understanding the Battery Warning
Ah, that rhythmic beep. If your Liftmaster garage door opener is making this sound, it’s trying to tell you something important. Don’t ignore it! This persistent beep is usually a battery warning signal. It indicates an issue with the backup battery unit specifically.
Sometimes, your opener will beep briefly when it’s actively running on battery power during a power outage. That’s normal – it’s just letting you know it’s doing its job. However, if the beep continues even when the power is on and stable, it almost certainly means the battery in your Liftmaster opener is weak or dead.
A continuous beep is a strong sign that the battery is low and needs replacement. It means the old battery isn’t holding a charge anymore. It won’t be able to provide power the next time you need it during an outage. Hearing that battery warning is your cue. It’s time to replace the Liftmaster garage door opener battery to keep your system ready for anything.
| Beep Pattern | What It Means | Action Needed |
|---|---|---|
| The battery is low or dead | Replace the battery soon | Replace battery soon |
| 🔊 Continuous beeping | Battery error or not charging | Recheck connections or replace |
| 🔊 Beeps only during outage | Running on backup power (normal) | No action needed |
Finding Your Liftmaster Garage Door Opener Model Number
Before you can swap out the battery in your Liftmaster, you need to know exactly which model you have. Liftmaster makes various openers, and they don’t all use the same replacement battery. Getting the right battery type is key for successful Liftmaster garage door opener battery replacement.
Look directly at the opener unit itself, which is mounted to the ceiling in your garage. You’re searching for a label or sticker. This label usually contains the brand name, model number, and serial number. Check the sides, bottom, or even the back of the unit.
The model number is what you need. You might see something like “Model 3850” or belong to an elite series. Some models specifically mention the battery they use, like units compatible with the 485lm battery. Finding this number helps you purchase the correct replacement battery designed for your specific Liftmaster garage door opener.
| Model Series | Model Numbers | Battery Backup | Compatible Battery | Notes |
|---|---|---|---|---|
| Elite Series | 8500, 8500W | Yes | 485LM | Wall-mount design |
| 8500C (Canada) | Yes | 485LM | Canadian variant | |
| Premium Series | 8550, 8550W | Yes | 485LM | Belt drive |
| 8550WLB | Yes | 485LM | Integrated LED lighting | |
| 8580W | Yes | 485LM | Heavy-duty chain drive | |
| 8360W | Yes | 485LM | Chain drive | |
| Contractor Series | 8160WB, 8160W | Optional | 485LM | Battery backup capable |
| 8165W | No | N/A | No battery backup | |
| Other Models | 87802 | Yes | 485LM | Integrated camera |
| 87504-267 | Yes | 485LM | Smart opener with LED lighting | |
| 84602 | Yes | 485LM | Chain drive with LED lighting | |
| 84501 | Yes | 485LM | Belt drive with LED lighting | |
| 8365W-267 | No | N/A | No battery backup | |
| 8010 | No | N/A | Basic model |
Getting to Know the Liftmaster 485LM Replacement Battery
If you’ve just checked your Liftmaster garage door opener model number, there’s a good chance you might need the Liftmaster 485LM battery (on Amazon). This is a very common and essential replacement battery for many popular Liftmaster openers with battery backup systems. It’s designed specifically to integrate with your unit for seamless power during an outage.
The 485LM is a 12-volt, sealed lead-acid (SLA) battery, often rated around 4.5Ah or 5Ah (Amp-hours). This battery type is chosen for its reliability and ability to provide a strong burst of power needed to lift a heavy garage door. It’s the genuine, manufacturer-recommended battery for compatible models, helping ensure reliable performance.
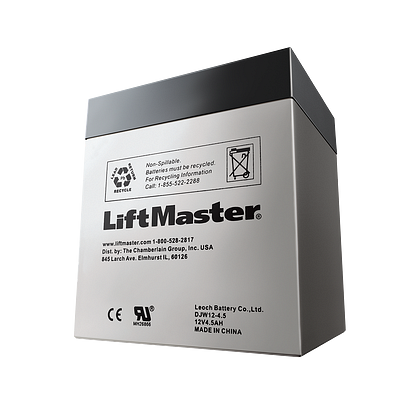
This battery is compatible with a range of Liftmaster DC motor models that feature integrated battery backup. This includes many from the 8360, 8550, WLED series, and sometimes older models like the 3850. You still need to check your specific model’s manual or the label on your old battery to confirm the 485LM is the correct match. While third-party replacement batteries exist, using the official Liftmaster version or a high-quality, compatible equivalent with the correct specs (12V, 4.5- 5Ah, F1 or F2 terminals depending on the unit) is recommended for best results and lifespan.
The lifespan of a 485LM battery, like any backup battery, is typically 2-3 years. Factors like how often you lose power and the temperature in your garage can influence this. When it starts to fail, that persistent beeping from your opener is the most common sign. Replacing it with a new 485LM restores your opener’s full backup functionality, offering that valuable peace of mind.
Gathering Your Tools for Battery Replacement
Good news! You don’t need a huge toolbox for this job. Liftmaster garage door opener battery replacement is pretty straightforward when it comes to tools. You likely already have everything you need right in your house or garage.
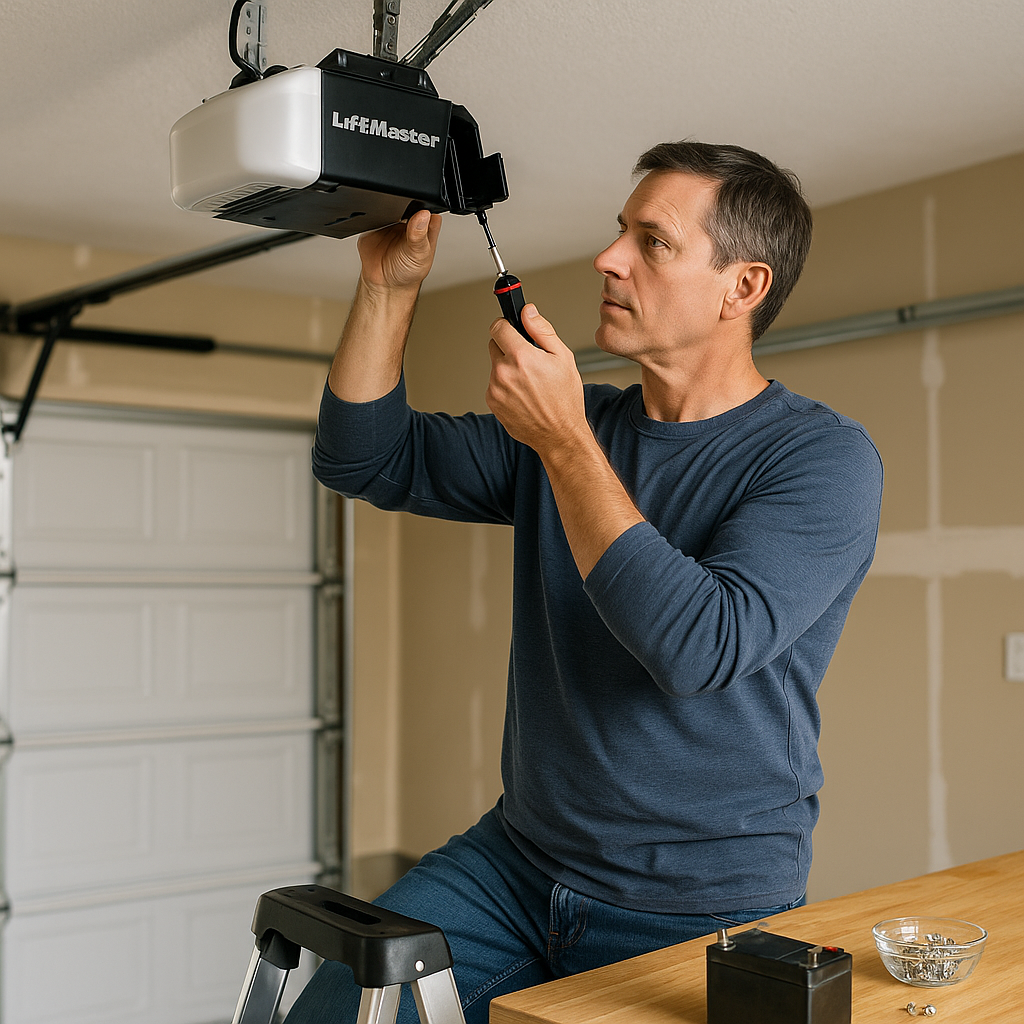
The main tool you’ll require is a screwdriver. The type you need will depend on your specific Liftmaster model. It could be a Phillips head or a flathead. Just take a quick look at the screws on your battery compartment cover beforehand.
That’s often it! Sometimes having a small cup or dish to hold the screws helps keep them from getting lost. But really, just a screwdriver is typically sufficient to access and replace the battery in your garage door opener.
Step-by-Step: Replace Your Liftmaster Garage Door Opener Battery
Ready to swap out that tired old battery? Performing a Liftmaster garage door opener battery replacement is a DIY job most people can tackle. Just follow these steps carefully. You’ll have your system powered up and ready for outages again in no time.
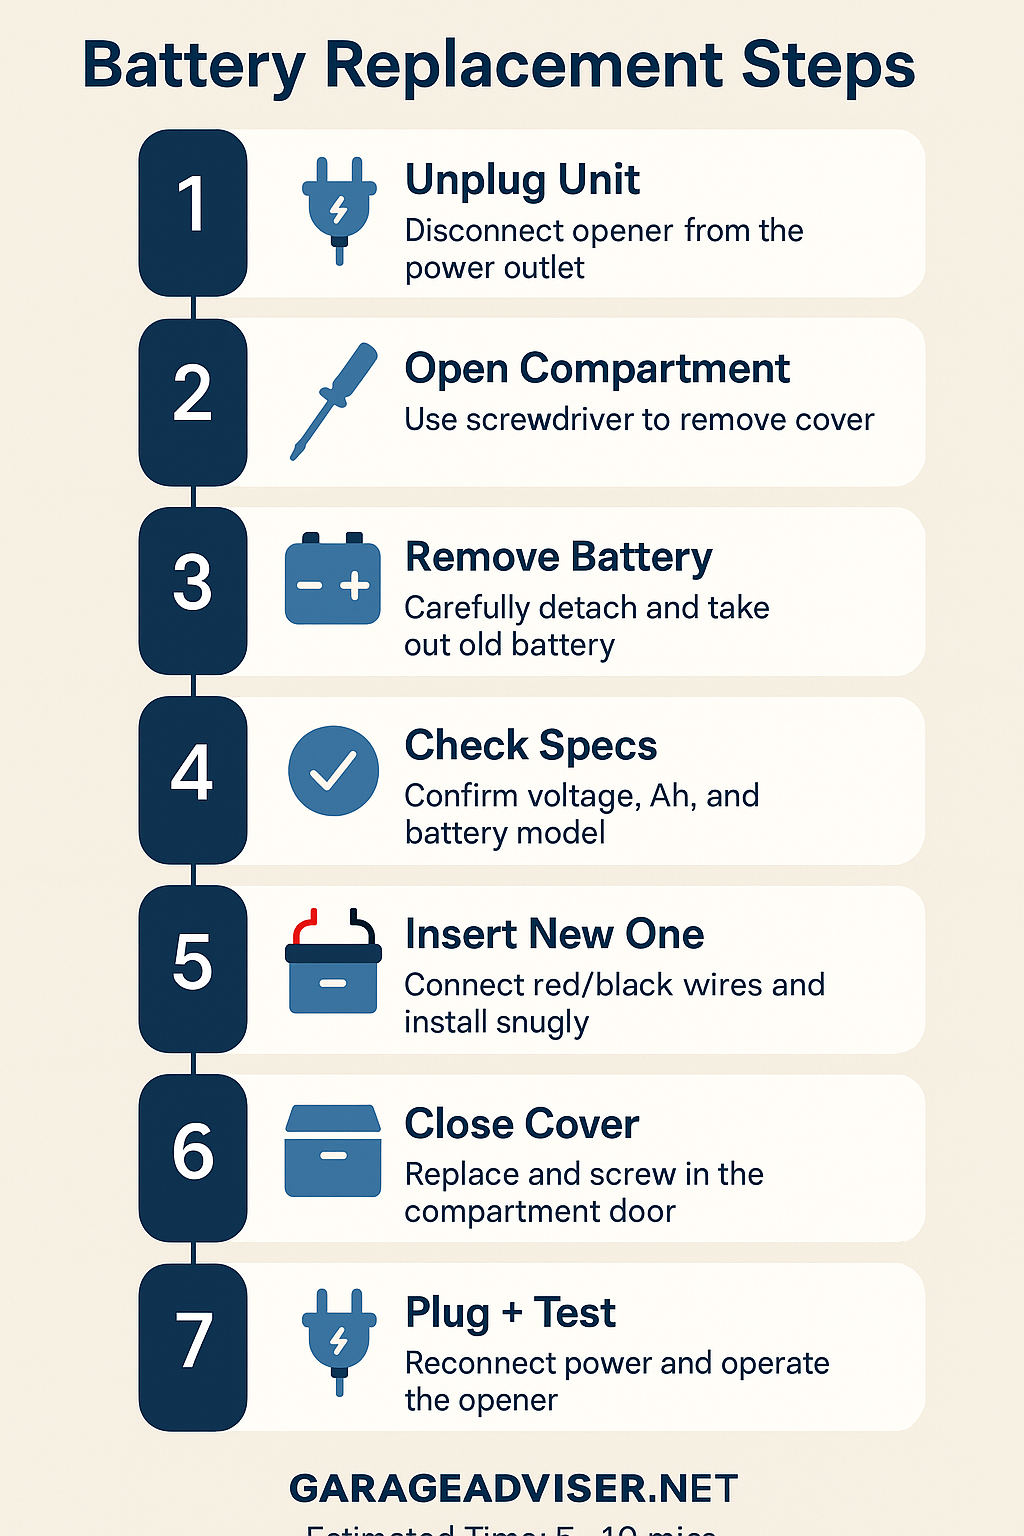
Step 1: Disconnecting Power to the Opener Unit
Safety first! Before you touch anything inside your opener, make sure it has no power going to it. Go to the outlet where your Liftmaster garage door opener is plugged into the ceiling. Simply disconnect the plug from the electrical outlet. This cuts off the main power supply to the opener unit.
Cutting the power prevents any accidental shocks or damage while you’re working inside the machine. It’s a quick and easy step, but it’s absolutely essential before you start any battery work.
Step 2: Locate and Open the Battery Compartment
Now, look for the battery compartment on your opener unit. It’s often located on one of the sides or the bottom of the housing. There will be a cover held in place by screws. This is where the battery in your Liftmaster lives.
Grab the screwdriver you prepared earlier. Use it to carefully remove the screws holding the battery compartment cover on. Keep the screws in a safe place, like a small dish, so you don’t lose them. Gently remove the cover to access the old battery.
Step 3: Remove the Old Battery
Once the compartment is open, you’ll see the old battery. It might be a rectangular, sealed lead-acid battery. The old battery will have two wires connected to it, usually red and black, which attach to terminals on the battery.
Carefully disconnect these battery terminals. They might just pull off gently, or they could have clips you need to pinch. Take note of which color wire connects to which terminal (positive/negative). Then, you can remove the battery from the compartment. It might be a snug fit.
Step 4: Identifying the Right Replacement Battery
With the old battery out, take a look at its label. This label provides crucial information, including the voltage and amp-hour rating. This tells you the exact battery type you need for your Liftmaster garage door opener battery replacement.
Match these specifications precisely when buying your replacement battery. For many Liftmaster units, the correct replacement battery is model 485lm. Using the wrong type or size could prevent your backup system from working correctly. Look for quality batteries that match the original specs.
Step 5: Insert the New Battery
Now it’s time to put the new battery in. Carefully place the new battery into the battery compartment. Make sure it fits snugly and is oriented correctly. Reconnect the red and black wires to the corresponding battery terminals on the new battery. Double-check that red goes to positive (+) and black goes to negative (-).
Replace the cover on the battery compartment. Use your screwdriver to secure the cover back with the screws you set aside.
Step 6: Reconnecting Power and Testing
You’re almost done! Go back to the power outlet and plug the opener unit back in. The opener will power back up. Listen for any beeps or error codes – hopefully, the beeping stops!
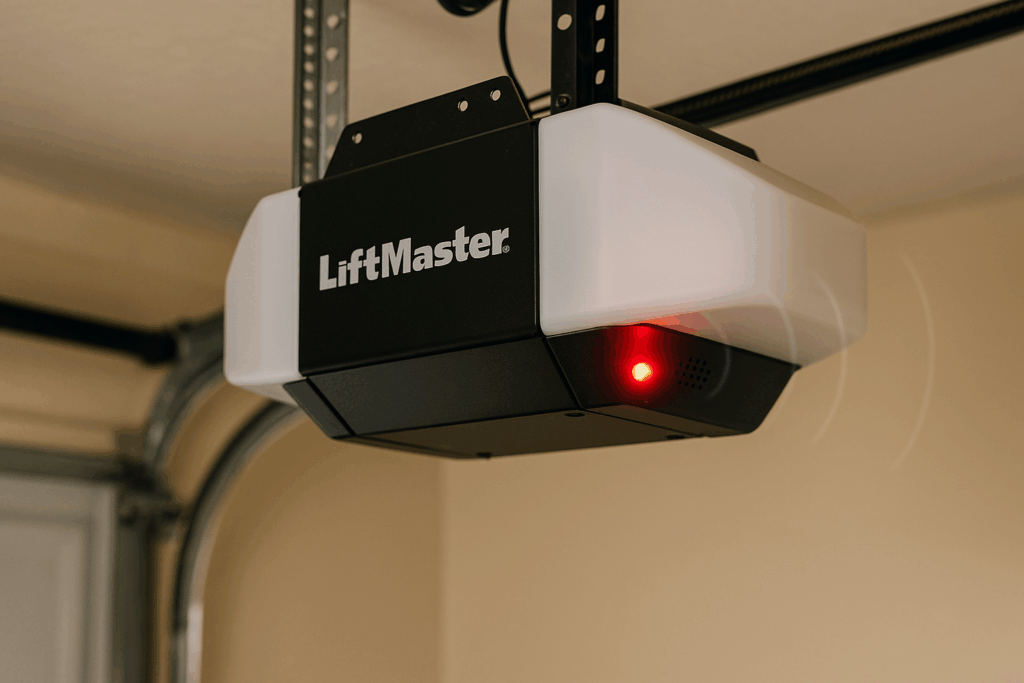
Test your garage door system to make sure everything is working correctly. Use your remote control or the wall panel to open and close the door. Check the LED light on the opener; its status might indicate the battery charge level or system status, depending on your model. This confirms your Liftmaster garage door opener battery replacement was successful!
Troubleshooting After Replacing Your Liftmaster Battery
Alright, you’ve replaced the battery, but your Liftmaster garage door opener is still acting up? Don’t panic! Troubleshooting is a normal part of DIY. There are a few simple things to check if the system isn’t working as expected after your battery replacement.
First, double-check your connections. Make sure the opener unit is firmly plugged back into the wall outlet. Open the battery compartment again and ensure the wires are securely attached to the correct battery terminals on the new battery. Red to positive, black to negative.
Verify you installed the right battery type. If the battery isn’t compatible with your specific Liftmaster model, it won’t charge or function correctly. Re-check the model number on your opener and compare it against the specs of the replacement battery you bought. It’s possible the new battery may be faulty, though this is less common with quality batteries.
If the beeping persists or the opener seems unresponsive, it could still indicate that the battery needs to be replaced, even if you just put a new one in (again, check compatibility and connection). While swapping the backup battery doesn’t typically require you to reprogram your remotes or keypad, sometimes other related issues might arise. Consult your Liftmaster manual or their support if basic checks don’t solve the problem.
Extending Your Liftmaster Battery Life
You’ve gone through the effort of the Liftmaster garage door opener battery replacement. Now, how do you make sure your new backup battery provides power for as long as possible? While no battery lasts forever, some simple habits can help extend the life of your battery in your garage opener.
Regular battery maintenance is key. Just like checking the oil in your car, occasionally checking on your garage door opener battery is a good idea. Listen for that familiar battery warning beep, even if the power isn’t out. This tells you the battery might be weakening before it completely dies.
Keeping your opener unit clean also helps. Dust and debris can sometimes affect electronic components and battery performance over time. Simply keeping the area around the unit tidy contributes to overall garage door maintenance and can support better Liftmaster Battery life. While you can’t always control the temperature in your garage, extreme heat or cold can impact batteries. If possible, maintaining a stable environment helps the battery last longer.
What About the Liftmaster Remote Control Battery?
It’s easy to confuse the battery in the main opener unit with the one in your remote control. They are completely different! Your Liftmaster garage door opener remote uses a much smaller battery, typically a flat, round coin cell battery.
Common sizes for these remote control batteries include CR2032 or CR2025. When the battery in your remote is weak or dead (battery is weak or dead), the remote simply won’t work. The opener unit won’t beep about this; the remote just becomes unresponsive.
Replacing the battery in your garage door opener remote is usually very simple. Most remotes have a small slot or screws on the back. You can often use a coin or a small screwdriver to open the remote. Inside, you’ll find the old coin cell battery. Carefully remove the battery and pop in the new one, making sure the positive (+) side faces up as indicated inside the remote. Close the remote, and you should be back in business with your garage door remote.
When Your Garage Door Needs Professional Repair
You’ve followed the steps, replaced the battery in your Liftmaster, but the opener is still misbehaving. What then? Replacing the battery doesn’t magically fix every garage door problem. Sometimes, the issue lies elsewhere in the garage door system.
If the door is physically stuck, making grinding noises, or won’t move manually even after disconnecting the opener, the problem isn’t electrical. It’s likely a mechanical issue with the springs, cables, or tracks. This definitely requires Garage door repair from a trained technician.
Also, if you are uncomfortable working with the opener unit or electrical components, it’s perfectly fine to call a professional. Your safety is the top priority. A qualified technician can quickly diagnose complex issues and perform the necessary repairs. Getting expert advice ensures the problem is fixed correctly and safely.
Frequently Asked Questions About Liftmaster Battery Replacement
Here are some of the questions people most often ask when dealing with their Liftmaster garage door opener battery.
How often need replacement?
A Liftmaster garage door opener battery typically lasts about 2-3 years under normal use. However, factors like temperature and how often it’s used during power outages can affect its lifespan. It’s a good idea to test it periodically as part of your garage door maintenance. If you hear the beeping, it definitely needs replacement.
What does the Beep mean?
The beep coming from your Liftmaster opener unit usually signals that the backup battery is low or faulty. It’s a battery warning that the battery either isn’t charging properly or isn’t holding a charge. Address the beep quickly by checking or replacing the battery.
Is this battery compatible with my opener’s uses?
You must match the replacement battery to your specific Liftmaster model number. Check the label on your opener unit for the model. Then, find a battery with the identical voltage and amp-hour (Ah) rating. The 485lm is a common battery type, but not for all models. Ensure the battery you buy is listed as battery compatible with your model.
Will replacing the battery doesn’t reprogram my remote?
No, replacing the battery doesn’t usually require you to reprogram your garage door opener remote or keypad. The main opener unit battery provides backup power to the system electronics. It doesn’t affect the radio signal programming for your remote controls.
Can a failing battery affect my garage door remote?
No, a failing battery in the opener unit does not affect your garage door remote. The remote has its own small coin cell battery (CR2032, CR2025, etc.). If your remote isn’t working, you need to replace the battery in the remote itself, not the opener unit battery.
What if I am still stuck outside your garage after replacing the battery?
If you are still stuck outside your garage or the opener isn’t working after you replace the battery, the problem is likely not the backup battery. It could be the main power source, a different component in the opener unit, or a mechanical issue with the door itself. At this point, it’s best to seek expert advice or professional Garage door repair.
Where to find replacement batteries?
You can find replacement batteries for your Liftmaster garage door opener at various places. Check home improvement stores, garage door supply stores, or online retailers. Make sure you know your model number and the correct battery type (like the 485lm) before you shop.
Conclusion: Powering Up Your Liftmaster Garage Door
You did it! Understanding and performing a Liftmaster garage door opener battery replacement is a valuable skill. It’s a simple yet critical part of keeping your home accessible and secure, especially during unexpected power outages. Don’t let a dead battery leave you stuck.
Taking the time to swap out the old battery for a new one ensures your system is always ready. It brings back that essential, reliable performance and gives you peace of mind. Plus, you silenced that annoying battery warning beep!
By knowing how to replace the battery in your Liftmaster, you keep your entire garage door system running smoothly. This simple maintenance task goes a long way in maintaining the functionality of your Liftmaster garage door opener. You’re now powered up and prepared!