When it comes to garage organization, wall shelves can be a game-changer. They help you maximize vertical space, keep the floor clear, and make it easy to access tools and supplies. The benefits of building your own wall shelves in the garage are numerous— from cost savings to customized sizing. In this comprehensive guide, we will walk you through how to build wall shelves in a garage using basic tools and materials. By the end of this article, you’ll have a sturdy and efficient storage solution tailored to fit your garage’s needs.
Why Build Wall Shelves in Your Garage?
Benefits of Wall Shelves
Building wall shelves in your garage offers several advantages that can significantly improve your storage space and overall organization:
- Maximizing Vertical Space: Garages often have a lot of unused vertical space. Wall shelves enable you to take advantage of this space, allowing you to store items off the floor.
- Keeping the Garage Floor Clear: By moving items up onto shelves, you free up valuable floor space. This makes it easier to park your car, move around, and keep the garage clean.
- Easy Access to Tools and Supplies: Wall shelves provide a convenient way to store and organize tools and supplies. Everything you need is within easy reach, making your garage more functional.
- Enhancing Garage Organization: A well-organized garage is not only more efficient but also safer. Wall shelves help you keep everything in its place, reducing clutter and minimizing the risk of accidents.
Cost-Effective Solution
Building your own wall shelves is a cost-effective alternative to purchasing pre-made shelving units. Here’s a simple cost breakdown for DIY garage shelves:
| Item | Estimated Cost |
|---|---|
| Two 2x4x8 Boards | $6 – $10 each |
| One 2’x8’ Sheet of ¾″ Plywood | $20 – $30 |
| Wood Screws | $5 – $10 |
| Lag Screws | $5 – $10 |
| Total | $36 – $60 |
Compared to store-bought shelving units, which can cost upwards of $100, building your own shelves is a much more affordable option. Plus, you get the added benefit of customizing the shelves to fit your specific needs.
Tools and Materials Needed for Building Garage Wall Shelves
Essential Tools
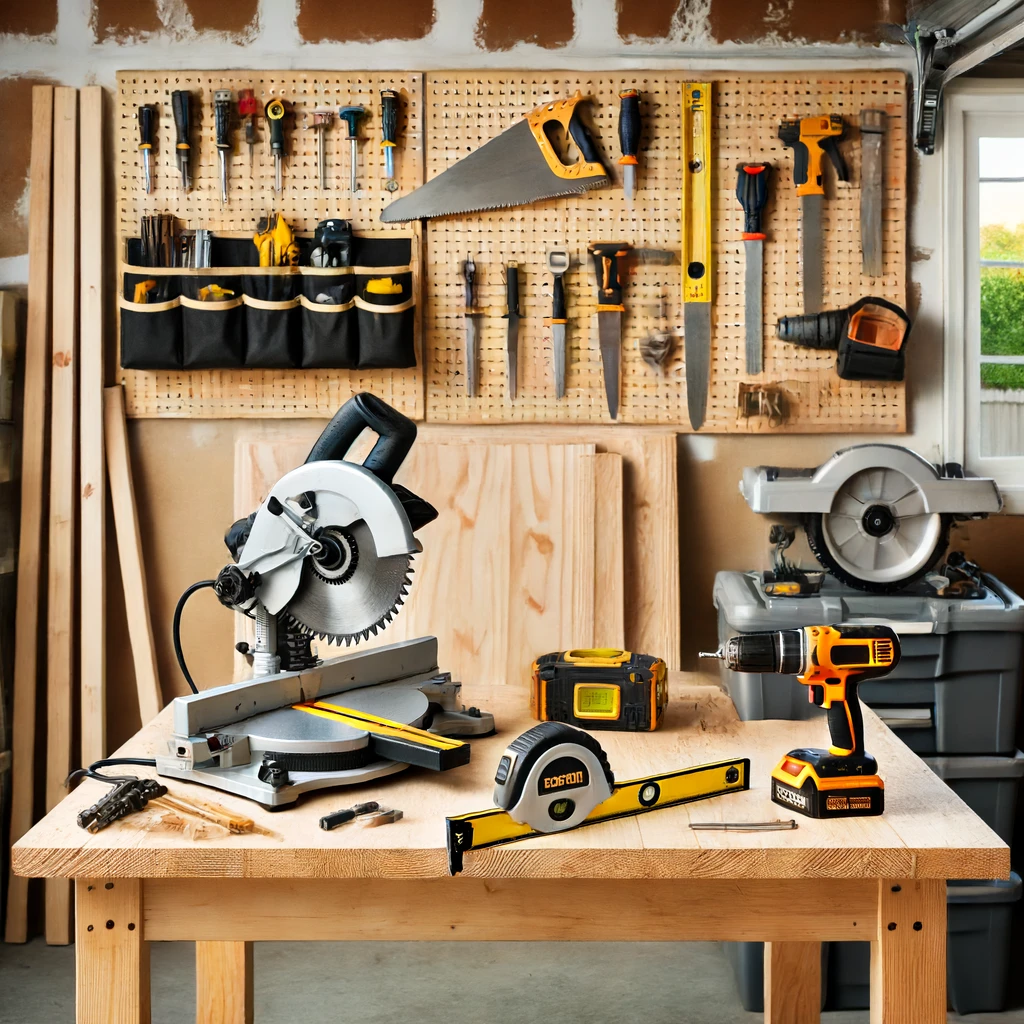
To build sturdy and reliable wall shelves, you’ll need the following tools:
- Miter Saw or Circular Saw: For cutting the 2x4s and plywood to size.
- Stud Finder: To locate the wall studs where you’ll attach the shelf supports.
- Power Drill: For drilling holes and driving screws.
- Screwdriver: For tightening screws.
- Tape Measure: To measure the dimensions of your shelves and the wall space.
- Level: To ensure the shelves are installed straight and even.
I’ve compiled a list of all of the tools I use for my DIY projects. These are tools that have stood the test of time and I can confidently recommend them. Check them out here.
Required Materials
Here’s a list of the materials you’ll need to build your garage wall shelves:
- Two 2x4x8 Boards: These will be used to create the shelf supports.
- One 2’x8’ Sheet of ¾″ Plywood: This will serve as the shelf surface.
- 1 ¼″ Wood Screws: To attach the plywood to the supports.
- 3″ Wood Screws: For assembling the shelf supports.
- 3 ½″ Lag Screws: To secure the supports to the wall studs.
- Storage Totes (optional): Great for organizing items on the shelves.
By gathering these tools and materials, you’ll be well-prepared to start building your garage wall shelves.
Step-by-Step Guide on How to Build Wall Shelves in a Garage
Planning and Measuring
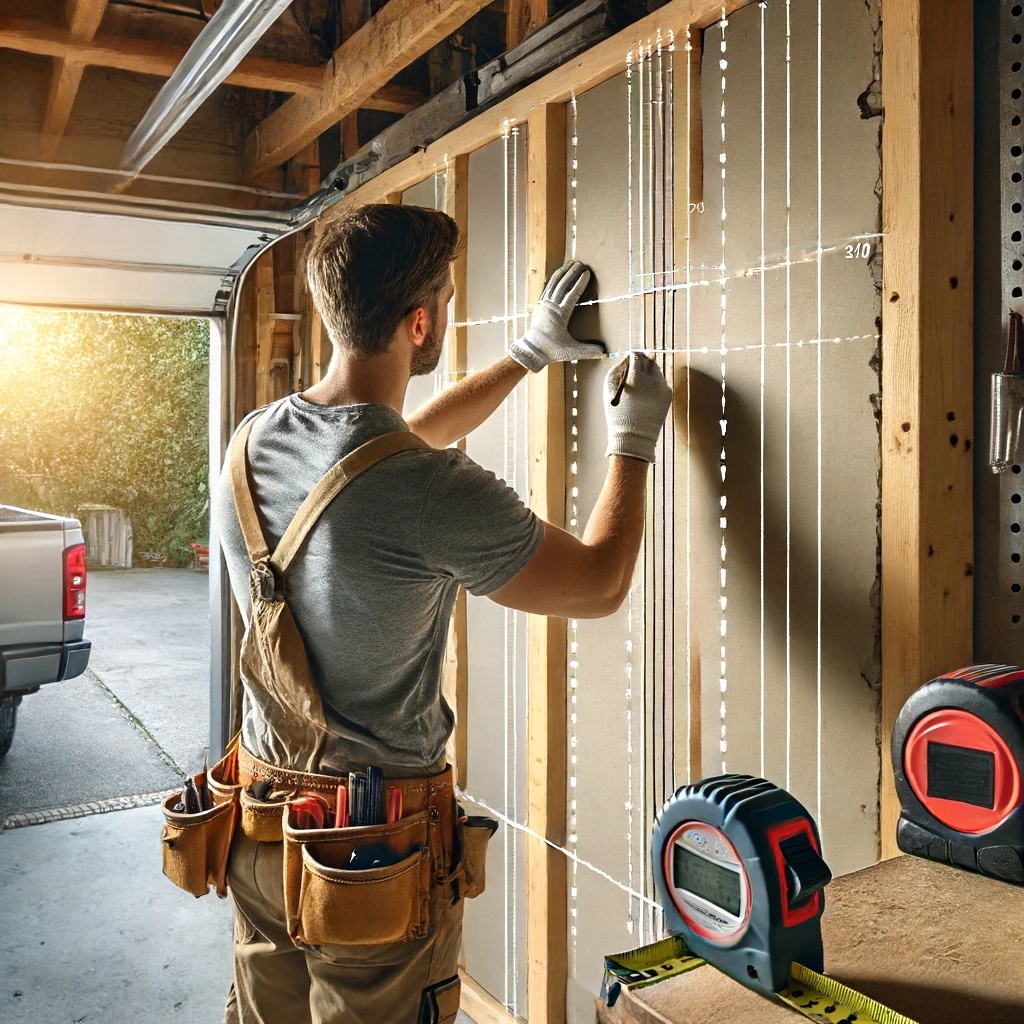
Before you start cutting wood and assembling your shelves, it’s crucial to take the time to plan and measure properly. This will ensure your shelves are the right size for your needs and securely attached to the wall.
- Determine the Size and Number of Shelves: Consider what you’ll be storing on the shelves. Measure your storage totes or bins to ensure the shelves are deep and long enough to accommodate them. Decide how many shelves you want to install and how much space you need between each shelf.
- Measure the Wall Space: Use a tape measure to determine the available wall space in your garage. Take note of the height, width, and any obstructions like windows, doors, or electrical outlets.
- Marking the Wall Studs: Most wall studs are spaced 16 inches apart, but for this project, you’ll be installing supports on every other stud, approximately 32 inches apart. Use a stud finder to locate the studs and mark their positions on the wall with a pencil.
Cutting the Materials
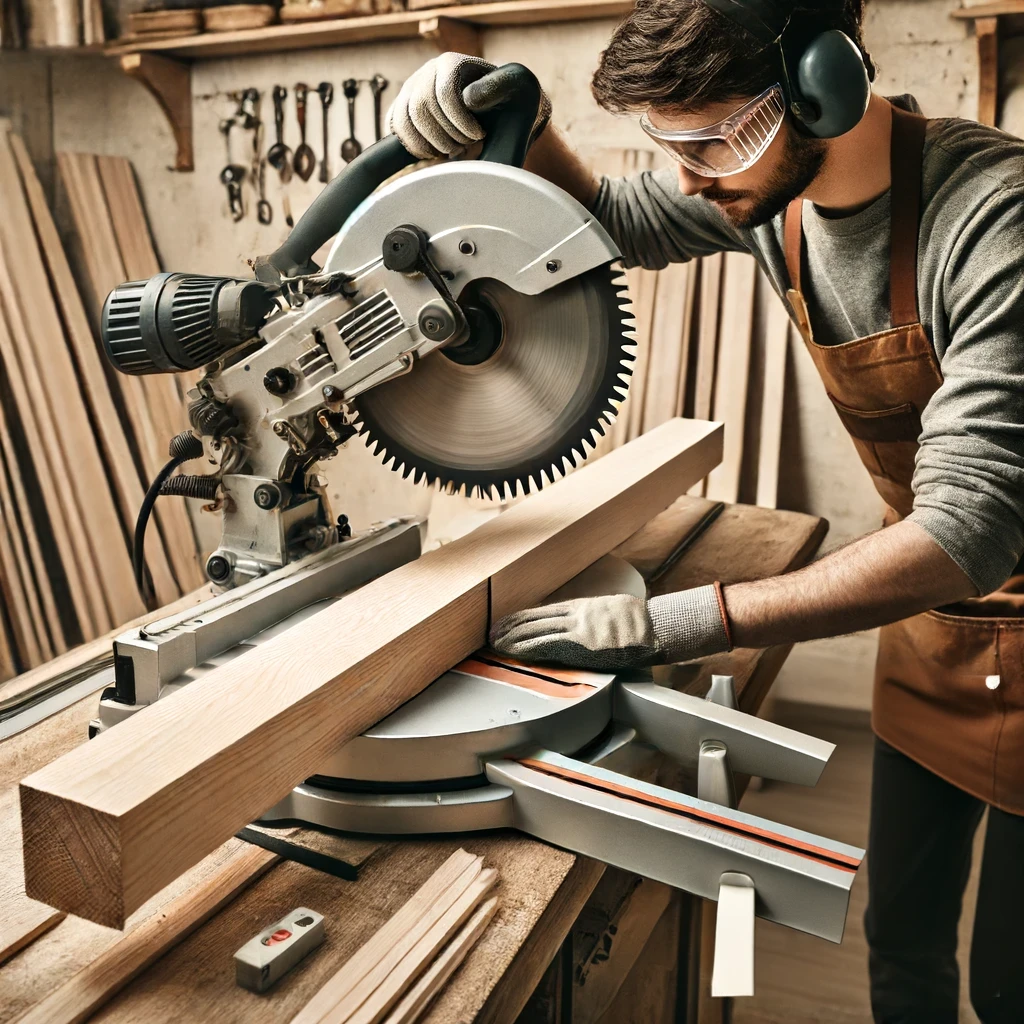
Once you have your measurements, it’s time to cut the materials to size. This step is crucial for ensuring your shelves fit perfectly and are sturdy enough to hold your items.
- Using a Miter Saw or Circular Saw: These tools are ideal for making precise cuts. If you don’t have a miter saw, a circular saw will work just fine.
- Creating a Cut List: Write down the dimensions of all the pieces you need to cut. This will help you stay organized and ensure you don’t miss any pieces.
- Cut 2x4s into Three Pieces for Each Support:
- 19″ top piece.
- 17 ½” back piece.
- 22 ½” piece with 45-degree mitered ends.
- Cut 2x4s into Three Pieces for Each Support:
- Cutting the Plywood: Rip a piece of ¾″ plywood to 19″ wide and 96″ long. This will serve as the shelf surface.
Building the Shelf Frame
With all your pieces cut, you can start assembling the shelf frame. This is where your shelves will start to take shape.
- Assemble the Shelf Supports: Using the 3″ wood screws, assemble the cut 2×4 pieces into a support frame. Ensure the supports remain square and sturdy. You’ll need to create four supports in total.
- Top Piece: Attach the 19″ top piece to the 17 ½” back piece.
- 45-Degree Brace: Attach the 22 ½” piece with 45-degree mitered ends to provide extra support.
- Securing the Frame with Wood Screws: Make sure the frame is securely fastened together. Double-check that all angles are square and the frame is sturdy.
Installing the Shelves
Now that your shelf frame is assembled, it’s time to install it on the wall. This step requires precision to ensure the shelves are level and securely attached to the wall studs.
- Attaching the Shelf Frame to the Wall Studs: Mark the desired shelf height on the wall and use a level to draw a horizontal line. Locate the wall studs and mark vertical lines where the supports will be attached.
- Ensuring the Frame is Level: Before securing the supports to the wall, double-check that they are level both horizontally and vertically. This will ensure your shelves are straight and even.
- Securing the Supports to the Wall Studs: Use 3 ½” lag screws to attach the supports to the wall studs. Make sure the supports are evenly spaced and securely fastened.
- Attaching the Plywood Shelf: Place the ¾″ plywood on top of the supports and secure it using 1 ¼″ wood screws. Ensure the plywood is flush with the edges of the supports.
Adding Shelf Supports
For added stability, you may want to install additional shelf supports or brackets, especially if you plan on storing heavy items.
- Installing Additional Supports: If needed, install extra supports between the main supports to distribute the weight more evenly.
- Using Brackets: Metal brackets can provide additional support and stability. Attach them to the wall studs and the underside of the shelves.
Tips and Tricks for Building Sturdy Garage Wall Shelves
Choosing the Right Materials
Selecting the right materials is crucial for building sturdy and long-lasting garage wall shelves. Here are some tips to help you choose wisely:
- Types of Wood and Plywood: Opt for high-quality lumber like pine or fir for the 2x4s. For the plywood, a ¾″ thick sheet is ideal for supporting heavier items. Avoid using particle board as it’s less durable.
- Heavy-Duty Options for Heavier Items: If you plan to store heavy tools or equipment, consider using 2x6s instead of 2x4s for the supports. You can also double up on the plywood or use thicker plywood for added strength.
I have a dedicated article on the best type of wood for garage shelves. For a more detailed and informed decision, I recommend you check it out.
Ensuring Stability and Safety
Stability and safety are paramount when building wall shelves in your garage. Follow these tips to ensure your shelves are secure:
- Double-Checking Measurements: Measure twice, cut once. Double-check all your measurements before cutting and assembling the shelves. This will help prevent errors that could compromise the stability of the shelves.
- Properly Securing Shelves to Wall Studs: Always attach the supports to wall studs, not just drywall. Use a stud finder to locate the studs and mark their positions. Secure the supports with 3 ½” lag screws to ensure they are firmly attached.
Maximizing Storage Space
To get the most out of your new garage wall shelves, consider these strategies for maximizing storage space:
- Utilizing Storage Bins and Totes: Storage bins and totes are excellent for organizing smaller items. Label each bin for easy identification and stack them neatly on the shelves.
- Organizing Items by Frequency of Use: Place frequently used items on the lower shelves for easy access. Store seasonal or rarely used items on the higher shelves. This way, you won’t have to move things around constantly.
Common Mistakes to Avoid When Building Garage Wall Shelves
Skipping the Planning Phase
One of the most common mistakes is rushing into the project without a proper plan. Here’s why planning is essential:
- Importance of a Detailed Plan: A detailed plan helps you visualize the final product and ensures you have all the necessary materials and tools. It also helps you avoid mistakes that could lead to wasted time and resources.
- Consequences of Poor Planning: Without a plan, you may end up with shelves that don’t fit your space or aren’t sturdy enough to hold your items. This can result in a lot of frustration and additional work.
Using Incorrect Materials
Using the wrong materials can compromise the integrity of your shelves. Here’s how to avoid this mistake:
- Issues with Weak Wood or Screws: Low-quality wood can warp or break under the weight of your items. Similarly, weak screws can strip or snap, causing the shelves to collapse.
- How to Choose the Right Materials: Invest in high-quality lumber and screws. It may cost a bit more upfront, but it will save you money and hassle in the long run.
Ignoring Wall Studs
Attaching shelves to drywall instead of wall studs is a recipe for disaster. Here’s why:
- Risks of Attaching Shelves to Drywall: Drywall isn’t strong enough to support the weight of your shelves and the items you’ll store on them. The shelves could pull away from the wall, causing damage and potential injury.
- Finding and Marking Wall Studs: Use a stud finder to locate the wall studs. Mark their positions clearly so you know where to attach the supports. This will ensure your shelves are securely anchored.
Also: How to Hide Garage Shelves: 5 Genius Ideas!
FAQs About Building Wall Shelves in a Garage
How Much Weight Can DIY Garage Wall Shelves Hold?
The weight capacity of your DIY garage wall shelves depends on several factors:
- Factors That Influence Weight Capacity: The type of wood, the thickness of the plywood, and the number of supports all play a role in determining how much weight your shelves can hold. Properly securing the shelves to wall studs is also crucial.
- Tips for Reinforcing Shelves: Use additional supports or brackets to distribute the weight more evenly. Doubling up on the plywood or using thicker plywood can also increase the weight capacity.
Can I Build Shelves Without a Miter Saw?
Yes, you can build shelves without a miter saw. Here are some alternatives:
- Alternative Tools and Methods: A circular saw or even a handsaw can be used to cut the wood. Just make sure to use a straight edge or guide to ensure accurate cuts.
- Pros and Cons of Different Tools: While a miter saw provides more precise and faster cuts, a circular saw is more versatile and can handle larger pieces of wood. A handsaw is the most affordable option but requires more effort and time.
How Do I Maintain and Clean My Garage Wall Shelves?
Proper maintenance and cleaning can extend the life of your garage wall shelves:
- Maintenance Tips: Regularly check the screws and supports to ensure they are still secure. Tighten any loose screws and replace any damaged components.
- Cleaning Methods for Different Materials: Use a damp cloth to wipe down wooden shelves. Avoid using harsh chemicals that can damage the wood. For metal brackets, a mild detergent and water will do the trick.
Conclusion
Building your own garage wall shelves offers numerous benefits, from maximizing vertical space to keeping your garage floor clear. By following this guide, you’ll have a sturdy and efficient storage solution that meets your specific needs. We’ve covered everything from the tools and materials required to step-by-step instructions and tips for ensuring stability and safety.
Building wall shelves in your garage is a rewarding DIY project that can be completed in just a few hours. Whether you’re a seasoned DIYer or a beginner, this guide provides all the information you need to get started. So grab your tools and start building your garage wall shelves today. Don’t forget to share your completed project with us!