
Are you tired of tripping over bikes, holiday decorations, and rarely-used tools in your garage? If so, you’re not alone. Many homeowners struggle with maximizing their garage space, and that’s where overhead garage storage racks come in. These clever storage solutions can transform your cluttered garage into an organized oasis, but one question often stands in the way: How much does it cost to install overhead garage racks?
In this comprehensive guide, we’ll dive deep into the world of overhead garage ceiling racks, exploring everything from their benefits to the various factors that influence their installation costs. Whether you’re a DIY enthusiast or considering professional installation, we’ve got you covered. By the end of this article, you’ll have a clear understanding of what to expect when budgeting for overhead garage racks.
Before we break down the costs, let’s take a quick look at the typical price range you might encounter:
- DIY Installation: $100 – $500
- Professional Installation: $300 – $1,500+
Keep in mind that these are just ballpark figures. The actual cost of installing overhead garage racks can vary significantly based on several factors, which we’ll explore in detail throughout this guide. So, let’s roll up our sleeves and dive into the nitty-gritty of overhead garage rack installation costs!
What Are Overhead Garage Racks?
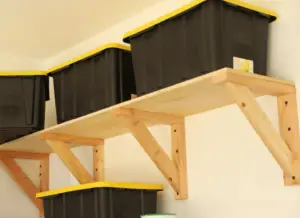
Overhead garage racks or garage ceiling storage racks are storage systems designed to maximize the vertical space in your garage. These racks are typically installed on the ceiling, utilizing the often-overlooked area above your head to create additional storage space. By doing so, they free up valuable floor space, allowing you to park your vehicles, set up a workbench, or simply move around more freely in your garage.
These ingenious storage solutions come in various types, each with its own set of features and benefits:
- Adjustable Racks: These versatile systems allow you to modify the height of the rack, making them ideal for storing items of different sizes.
- Fixed Racks: As the name suggests, these racks are permanently installed at a set height, offering stability for heavier items.
- Motorized Racks: For those who want the ultimate in convenience, motorized racks can be lowered and raised with the push of a button.
- Platform Racks: These provide a solid surface for storing boxes and containers, making them perfect for seasonal decorations or rarely-used items.
- Hoist Systems: Ideal for bicycles, kayaks, or other large items, hoist systems allow you to easily raise and lower your belongings.
The benefits of installing overhead storage in garages are numerous:
- Maximized Space Utilization: By taking advantage of vertical space, you can effectively double or even triple your storage capacity.
- Improved Organization: With designated storage areas, it’s easier to keep your garage tidy and find items when you need them.
- Enhanced Safety: By getting items off the floor, you reduce tripping hazards and protect your belongings from potential water damage.
- Increased Property Value: A well-organized garage can be a selling point for potential buyers if you ever decide to move.
- Versatility: Overhead racks can store a wide variety of items, from holiday decorations to sporting equipment and tools.
When considering the cost of installing overhead garage racks, it’s important to weigh these benefits against the initial investment. For many homeowners, the improved functionality and organization of their garage more than justify the expense.
In the next section, we’ll delve into the various factors that can influence the cost of installing overhead garage storage racks, helping you understand what goes into pricing these storage solutions.
Factors Affecting the Cost of Installing Overhead Garage Storage Racks
When it comes to determining the cost of installing overhead racks in garages, several key factors come into play. Understanding these elements will help you better estimate the potential expense and make an informed decision about your garage storage solution.
1. Size and Dimensions of the Rack
The size of the overhead rack is perhaps the most significant factor affecting its cost. Larger racks require more materials and often more complex installation, which naturally increases the price. Here’s a general guideline:
| Rack Size | Typical Price Range |
|---|---|
| Small (4′ x 4′) | $100 – $300 |
| Medium (4′ x 8′) | $200 – $500 |
| Large (4′ x 12′ or larger) | $400 – $1000+ |
2.Material Quality
The materials used in constructing the rack play a crucial role in both its durability and cost. Common materials include:
- Steel: Typically the most affordable option, steel racks are sturdy but may be prone to rust if not properly coated.
- Powder-Coated Steel: Slightly more expensive than basic steel, but offers better rust resistance.
- Aluminum: Lightweight and naturally rust-resistant, aluminum racks are often pricier than steel options.
- Weight Capacity
The weight capacity of the rack is directly related to its construction and the materials used. Higher weight capacities generally come with a higher price tag. Consider the following ranges:
- Light-Duty: Up to 250 lbs – Suitable for lightweight storage
- Medium-Duty: 250-450 lbs – Good for most household storage needs
- Heavy-Duty: 450+ lbs – Ideal for storing heavy equipment or large quantities of items
- Brand Reputation
Well-known brands often command higher prices due to their reputation for quality and reliability. While you might pay more upfront, reputable brands often offer better warranties and customer support, which can save money in the long run.
3. Installation Complexity
The difficulty of installation can significantly impact the overall cost, especially if you’re hiring professionals. Factors that can increase installation complexity include:
- High or vaulted ceilings
- Obstructions like light fixtures or ductwork
- The need for additional support beams
- Custom sizing or configurations
- Location and Accessibility of Your Garage
Your geographic location can affect costs in several ways:
- Labor Rates: Installation costs vary by region, with urban areas typically being more expensive.
- Building Codes: Some areas may have stricter building codes, requiring additional materials or inspections.
- Garage Accessibility: If your garage is difficult to access, it may increase labor costs.
By considering these factors, you can begin to form a more accurate picture of what it might cost to install overhead garage racks in your specific situation. In the next section, we’ll break down the average costs you can expect for both DIY and professional installations.
Breaking Down the Costs: What You’ll Pay for Overhead Garage Storage Racks
To give you a clearer picture of what you might expect to pay for garage ceiling racks, let’s break down the costs for both DIY and professional installations. Keep in mind that these are average figures, and your actual costs may vary based on the factors we discussed in the previous section.
DIY vs. Professional Installation
The choice between DIY and professional installation is often the biggest factor in determining your overall cost. Here’s a quick comparison:
| Installation Type | Average Cost Range | Pros | Cons |
|---|---|---|---|
| DIY | $100 – $500 | – Lower cost – Sense of accomplishment – Flexibility in timing | – Requires time and effort – Potential for mistakes – May void warranty |
| Professional | $300 – $1,500+ | – Expert installation – Time-saving – Often includes warranty | – Higher cost – Dependent on installer’s schedule |
Cost Ranges for Different Types and Sizes
Let’s look at the average costs for different types of overhead garage racks:
- Adjustable Racks
- Small (4′ x 4′): $150 – $300
- Medium (4′ x 8′): $250 – $500
- Large (4′ x 12′): $400 – $800
- Fixed Racks
- Small (4′ x 4′): $100 – $250
- Medium (4′ x 8′): $200 – $450
- Large (4′ x 12′): $350 – $700
- Motorized Racks
- Medium (4′ x 8′): $800 – $1,500
- Large (4′ x 12′): $1,200 – $2,500+
- Platform Racks
- Small (4′ x 4′): $120 – $280
- Medium (4′ x 8′): $220 – $480
- Large (4′ x 12′): $380 – $750
- Hoist Systems
- Single Bike Hoist: $50 – $150
- Heavy-Duty Hoist: $200 – $500
Additional Costs to Consider
When budgeting for your overhead garage rack installation, don’t forget to factor in these potential additional costs:
- Hardware: If not included in your kit, you may need to purchase bolts, screws, and other fasteners ($20 – $50).
- Tools: For DIY installation, you might need to buy or rent tools such as a drill, level, or stud finder ($50 – $200).
- Safety Equipment: Ladder, safety glasses, and work gloves ($50 – $150).
- Electrical Work: If installing motorized racks, you may need an electrician ($50 – $100 per hour).
- Permits: Some localities require permits for garage modifications ($50 – $200).
Potential Hidden Costs
Be aware of these possible hidden costs that could increase your overall expense:
- Ceiling Reinforcement: If your ceiling joists aren’t strong enough to support the racks, you may need to reinforce them ($200 – $500).
- Removal of Existing Fixtures: Costs for removing old shelving or light fixtures ($50 – $200).
- Painting or Patching: After installation, you might need to touch up paint or patch holes ($50 – $150).
- Extended Warranties: Optional extended warranties can add $50 – $200 to your cost.
By considering all these factors and potential costs, you can create a more accurate budget for your overhead garage rack installation. In the next sections, we’ll dive deeper into the specifics of DIY and professional installation costs to help you decide which option is best for you.
DIY Installation Costs: How Much Does DIY Overhead Garage Rack Installation Cost?

For those who enjoy hands-on projects and want to save money, DIY installation of overhead garage racks can be an attractive option. Let’s break down the costs associated with a typical DIY installation.
Average Cost of DIY Kits
DIY overhead garage rack kits typically range from $100 to $500, depending on the size, material, and brand. Here’s a more detailed breakdown:
| Rack Size | Average Kit Cost |
|---|---|
| Small (4′ x 4′) | $100 – $200 |
| Medium (4′ x 8′) | $150 – $350 |
| Large (4′ x 12′) | $250 – $500 |
Pro Tip: Look for sales or bulk discounts if you plan to install multiple racks. Some retailers offer significant savings when you purchase more than one kit.
Tools Needed and Their Costs

While you may already own some of these tools, here’s a list of what you might need for a DIY installation:
- Power Drill: $50 – $150
- Stud Finder: $20 – $50
- Level: $10 – $30
- Tape Measure: $5 – $20
- Socket Wrench Set: $30 – $100
- Ladder or Step Stool: $50 – $200
- Safety Glasses: $5 – $20
- Work Gloves: $10 – $30
If you need to purchase all of these tools, you’re looking at an additional cost of $180 to $600. However, many homeowners already own some of these items, which can significantly reduce the extra expense.
Pros and Cons of DIY Installation
Before deciding on DIY installation, consider these advantages and disadvantages:
Pros:
- Cost savings on labor
- Flexibility in scheduling the project
- Sense of accomplishment
- Ability to customize the installation to your exact needs
Cons:
- Time-consuming (expect to spend 3-6 hours per rack)
- Risk of improper installation, which could lead to safety hazards
- Potential to void manufacturer warranties
- May require assistance for lifting and positioning racks
Time Investment for DIY Projects
The time required for a DIY installation can vary based on your experience level and the complexity of the project. Here’s a rough estimate:
- Preparation: 1-2 hours (measuring, marking stud locations, gathering tools)
- Installation: 2-4 hours per rack
- Clean-up: 30 minutes to 1 hour
For a typical two-rack installation, you should set aside a full day (8-10 hours) to complete the project.
Important Safety Note: Always prioritize safety when working on DIY projects. Ensure you have a stable ladder or platform to work from, use proper safety equipment, and don’t hesitate to ask for help when lifting heavy components.
Cost-Saving Tips for DIY Installation
- Rent tools: If you don’t own the necessary tools and don’t plan to use them often, consider renting them from a local hardware store.
- Compare prices: Shop around for the best deals on DIY kits. Online marketplaces often offer competitive prices.
- Buy in bulk: If you’re installing multiple racks, look for bulk discounts on hardware and materials.
- Opt for simpler designs: Basic rack designs are often easier to install and less expensive than more complex systems.
- Plan carefully: Measure twice and cut once to avoid costly mistakes and wasted materials.
By carefully considering these factors and planning your DIY installation, you can significantly reduce the cost of installing overhead garage racks while still achieving a functional and organized storage solution. In the next section, we’ll explore the costs associated with professional installation for those who prefer to leave the job to the experts.
Professional Installation Costs: What’s the Price Tag for Professional Overhead Garage Rack Installation?
While DIY installation can save money, many homeowners prefer the peace of mind that comes with professional installation. Let’s explore the costs associated with hiring a pro to install your overhead garage racks.
Average Labor Costs
Professional installation costs can vary widely depending on your location, the complexity of the job, and the installer’s experience. Here’s a general breakdown of what you might expect to pay:
| Service | Average Cost Range |
|---|---|
| Basic Installation (per rack) | $150 – $300 |
| Complex Installation (per rack) | $250 – $500 |
| Minimum Service Fee | $100 – $200 |
Note: Some installers charge by the hour rather than per rack. Hourly rates typically range from $50 to $100 per hour.
Factors Affecting Professional Installation Prices
Several factors can influence the cost of professional installation:
- Garage Ceiling Height: Higher ceilings may require specialized equipment or additional labor, increasing costs.
- Ceiling Material: Concrete or metal ceilings might require special mounting hardware, potentially raising the price.
- Number of Racks: Installing multiple racks often comes with a discount per unit.
- Accessibility: If your garage is difficult to access or work in, it may increase labor costs.
- Local Market: Prices can vary significantly based on your geographic location and local competition.
- Seasonal Demand: Some installers may charge more during peak seasons (typically spring and fall).
Benefits of Hiring a Professional
While more expensive than DIY, professional installation offers several advantages:
- Expertise: Professionals have the knowledge to handle unexpected issues and ensure proper installation.
- Time-Saving: A pro can typically complete the job in a fraction of the time it would take a DIY-er.
- Warranty: Many professional installations come with a workmanship warranty.
- Safety: Professionals have the proper equipment and training to safely install overhead racks.
- Convenience: No need to purchase or rent tools, or spend time learning installation techniques.
How to Choose a Reliable Installer
To ensure you’re getting the best value for your money, follow these tips when selecting a professional installer:
- Get Multiple Quotes: Aim for at least three quotes to compare prices and services.
- Check Credentials: Look for licensed and insured professionals with good standing in local business bureaus.
- Read Reviews: Check online reviews and ask for references from past customers.
- Ask About Experience: Choose installers with specific experience in overhead garage rack installation.
- Clarify the Quote: Ensure the quote includes all costs (materials, labor, cleanup) to avoid surprises.
- Inquire About Warranties: Ask about both manufacturer and workmanship warranties.
Case Study: Professional vs. DIY Installation
Let’s compare the costs for installing two 4′ x 8′ overhead racks:
DIY Installation:
- Rack Kits: $300 – $700
- Tools (if needed): $180 – $600
- Total DIY Cost: $480 – $1,300
Professional Installation:
- Rack Kits: $300 – $700
- Installation Labor: $300 – $600
- Total Professional Cost: $600 – $1,300
As you can see, the cost difference can be minimal, especially if you need to purchase tools for a DIY project. The decision often comes down to your comfort level, available time, and desire for a warranty on the installation work.
In the next section, we’ll explore some cost-saving tips that can help you reduce the overall expense of installing overhead garage racks, whether you choose DIY or professional installation.
Cost-Saving Tips: How to Save Money on Overhead Garage Rack Installation
Whether you’re opting for DIY or professional installation, there are several strategies you can employ to reduce the overall cost of installing overhead garage racks. Let’s explore some money-saving tips that can help you get the storage solution you need without breaking the bank.
1. Comparing Quotes from Multiple Providers
One of the most effective ways to save money is to shop around. Here’s how to do it effectively:
- Get at least 3-5 quotes: This gives you a good range of prices and services.
- Look beyond price: Consider the quality of materials, warranty offerings, and customer reviews.
- Negotiate: Don’t be afraid to ask if a provider can match or beat a competitor’s price.
Pro Tip: Use online quote comparison tools to quickly gather estimates from multiple providers in your area.
2. Seasonal Discounts and Promotions
Timing your purchase can lead to significant savings:
- Off-season installations: Many installers offer discounts during their slow seasons (typically winter and mid-summer).
- Holiday sales: Look for deals around major holidays like Black Friday, Memorial Day, or Labor Day.
- End-of-year clearances: Retailers often slash prices on remaining inventory at year’s end.
3. Bulk Purchasing for Multiple Racks
If you’re planning to install multiple racks, buying in bulk can lead to substantial savings:
- Package deals: Many manufacturers offer discounts on multi-rack packages.
- Bulk hardware: Purchasing fasteners and mounting hardware in larger quantities can reduce per-unit costs.
- Combined shipping: Ordering all your materials at once can reduce shipping fees.
Example Savings:
| Number of Racks | Individual Price | Bulk Price | Savings |
|---|---|---|---|
| 1 | $250 | $250 | $0 |
| 2 | $500 | $450 | $50 |
| 4 | $1000 | $800 | $200 |
4. Opting for Simpler Designs
While fancy features can be appealing, they often come with a higher price tag. Consider these cost-effective alternatives:
- Fixed vs. adjustable: Fixed racks are typically less expensive than adjustable models.
- Standard sizes: Custom sizes often cost more. Stick with standard dimensions when possible.
- Manual vs. motorized: Manual racks are significantly cheaper than motorized options.
5. DIY Partial Installation
If you’re handy but not confident about doing the entire installation yourself, consider a hybrid approach:
- Prep work: Do the measuring, marking, and prep work yourself, then hire a pro for the actual installation.
- Assist the pro: Some installers offer discounts if you act as their assistant during the installation.
6. Utilize Coupons and Cashback
Don’t overlook these additional savings opportunities:
- Manufacturer coupons: Check the manufacturer’s website for promotional codes.
- Cashback apps: Use apps like Rakuten or Ibotta for additional savings on online purchases.
- Credit card rewards: Some credit cards offer extra cashback for home improvement purchases.
7. Consider Alternative Materials
While steel is the most common material for overhead racks, consider these alternatives:
- Wire shelving: Often cheaper than solid steel racks and can be suitable for lighter loads.
- Aluminum: Though sometimes pricier upfront, it’s lighter and won’t rust, potentially saving on long-term maintenance.
8. Plan and Measure Carefully
Avoid costly mistakes by planning meticulously:
- Accurate measurements: Double-check all measurements to avoid ordering the wrong size.
- Check weight limits: Ensure your ceiling can support the racks to avoid costly reinforcements later.
- Plan for future needs: It might be more cost-effective to install a slightly larger system now than to add more racks later.
By implementing these cost-saving strategies, you can significantly reduce the overall expense of installing overhead garage racks. Remember, the goal is to find a balance between cost, quality, and functionality that meets your specific needs and budget.
In the next section, we’ll discuss the return on investment you can expect from installing overhead garage racks, helping you understand the long-term value of this home improvement project.
Is Installing Overhead Garage Racks Worth the Cost?
When considering any home improvement project, it’s important to evaluate the return on investment (ROI). While overhead garage racks might seem like a significant expense upfront, they can offer substantial value over time. Let’s explore the long-term benefits and potential financial returns of this storage solution.
Long-term Benefits of Increased Storage Space
- Improved Organization: A well-organized garage can save you time and reduce stress by making items easily accessible.
- Protection of Valuables: Keeping items off the floor protects them from potential water damage, pests, and accidental damage.
- Increased Usable Space: By utilizing vertical space, you free up floor area for other purposes, such as:
- Parking additional vehicles
- Setting up a home gym
- Creating a workshop area
- Energy Efficiency: A clutter-free garage with proper air circulation can be more energy-efficient, potentially reducing heating and cooling costs.
- Safety Improvements: Reducing clutter on the floor minimizes tripping hazards and improves overall garage safety.
Potential Increase in Property Value
While it’s challenging to assign an exact dollar value to garage improvements, several factors suggest that overhead racks can positively impact your home’s value:
- Appealing to Buyers: A well-organized garage is a selling point for many homebuyers. According to a 2015 Impulse Research survey:
- 32% of homeowners said their garage was too disorganized to fit their car inside.
- 74% of prospective buyers rated garage storage as extremely or very important.
- Perceived Home Value: A National Association of Home Builders study found that 85% of homebuyers want garage storage space, indicating that this feature can make your home more attractive in the real estate market.
- Return on Investment: While exact figures vary, garage improvements typically offer a good ROI. HomeAdvisor suggests that garage remodels can recoup 65% to 85% of their cost when you sell your home.
Case Study: A homeowner in suburban Chicago installed $1,500 worth of garage ceiling storage racks and organizational systems. When selling their home two years later, the real estate agent highlighted the organized garage as a key feature. The home sold for $5,000 more than similar properties in the neighborhood, representing a 333% ROI on the garage improvement.
Improved Garage Organization and Functionality

The value of an organized, functional garage extends beyond mere dollars and cents:
- Time Savings: A well-organized garage can save you hours of searching for items over the years.
- Stress Reduction: A clutter-free environment can reduce stress and improve overall well-being.
- Increased Usability: With better organization, you’re more likely to use your garage for its intended purposes, maximizing your home’s functional space.
- Maintenance Ease: Organized spaces are easier to clean and maintain, potentially reducing long-term maintenance costs.
Calculating Your Potential ROI
To estimate your potential return on investment, consider the following:
- Installation Costs: Total cost of racks and installation
- Value of Reclaimed Space: Estimate the value of floor space freed up (e.g., ability to park an additional car)
- Potential Home Value Increase: Research similar homes in your area with organized garages
- Personal Value: Assign a value to the time and stress saved by improved organization
Example ROI Calculation:
- Installation Cost: $1,500
- Value of Reclaimed Space: $1,000 (ability to park second car inside)
- Potential Home Value Increase: $3,000
- Personal Value (over 5 years): $1,500 ($25/month in time savings)
Total Value: $5,500 ROI: ($5,500 – $1,500) / $1,500 = 267%
While your specific ROI may vary, this example illustrates the potential long-term value of installing garage ceiling storage racks.
In conclusion, when considering the cost of installing garage ceiling storage racks, it’s crucial to look beyond the initial expense. The long-term benefits in terms of organization, space utilization, potential property value increase, and personal satisfaction often outweigh the upfront costs, making it a worthwhile investment for many homeowners.
In the next section, we’ll discuss the ongoing maintenance costs associated with overhead garage storage racks to give you a complete picture of the long-term financial commitment.
Maintenance Costs: What Are the Ongoing Costs of Overhead Garage Storage Racks?
While the initial installation of overhead garage racks is the primary expense, it’s important to consider the long-term maintenance costs to get a full picture of your investment. Fortunately, these racks are generally low-maintenance, but there are still some factors to keep in mind.
Regular Maintenance Requirements
Overhead racks in garages typically require minimal maintenance, but regular check-ups can prevent issues and extend the life of your storage system. Here’s a basic maintenance schedule:
- Monthly Inspection:
- Visual check for any signs of wear or damage
- Ensure all bolts and fasteners are tight
- Check for any sagging or misalignment
- Quarterly Cleaning:
- Dust and cobweb removal
- Wipe down with a damp cloth
- Check for any rust spots (for steel racks)
- Annual Deep Clean and Inspection:
- Thorough cleaning of all surfaces
- Detailed inspection of all components
- Lubrication of any moving parts (for adjustable or motorized racks)
Estimated Annual Maintenance Cost: $20 – $50 for cleaning supplies and basic tools.
Potential Repair Costs
While well-installed and maintained overhead racks rarely need repairs, it’s wise to be prepared for potential issues:
- Loose Bolts or Fasteners:
- DIY Fix: $0 – $10 for replacement hardware
- Professional Fix: $50 – $100 for a service call
- Rust Treatment (for steel racks):
- DIY Fix: $20 – $40 for rust treatment products
- Professional Fix: $100 – $200 for treatment and repainting
- Sagging or Misalignment:
- DIY Fix: $0 – $50 for additional support hardware
- Professional Fix: $150 – $300 for reinforcement and realignment
- Motorized System Repairs (if applicable):
- DIY Fix: Generally not recommended for safety reasons
- Professional Fix: $200 – $500 depending on the issue
Note: These are estimated ranges. Actual costs may vary based on your location and the specific issue.
Lifespan of Overhead Garage Storage Racks
The longevity of your overhead garage racks depends on several factors:
- Material Quality: High-quality steel or aluminum racks can last 20-30 years or more.
- Installation Quality: Properly installed racks are less likely to develop issues over time.
- Usage: Racks used within their weight capacity will last longer than overloaded ones.
- Environment: Garages with high humidity or temperature fluctuations may see reduced lifespan for certain materials.
| Material | Average Lifespan | Factors Affecting Longevity |
|---|---|---|
| Steel | 20-30 years | Rust resistance, paint quality |
| Powder-Coated Steel | 25-35 years | Coating thickness, environmental factors |
| Aluminum | 30+ years | Corrosion resistance, alloy quality |
Cost-Effective Maintenance Tips
- Regular Cleaning: Prevents buildup of dirt and moisture that can lead to rust or corrosion.
- Prompt Repairs: Addressing small issues quickly prevents them from becoming major problems.
- Weight Distribution: Evenly distribute weight to prevent stress on specific areas of the rack.
- Rust Prevention: For steel racks, consider applying a rust inhibitor annually (cost: $10-$20).
- Weather Sealing: If your garage is prone to moisture, invest in weather stripping for doors and windows to protect your racks (cost: $50-$100).
Long-Term Cost Comparison
Let’s compare the long-term costs of different rack types over a 20-year period:
| Rack Type | Initial Cost | Annual Maintenance | 20-Year Total Cost |
|---|---|---|---|
| Basic Steel | $300 | $30 | $900 |
| Powder-Coated Steel | $400 | $20 | $800 |
| Aluminum | $500 | $15 | $800 |
As you can see, while aluminum racks may have a higher upfront cost, their lower maintenance requirements can make them more cost-effective in the long run.
When to Replace vs. Repair
Generally, if repair costs exceed 50% of the cost of a new rack, replacement is often the more economical choice. However, consider these factors:
- Age of the Rack: If it’s nearing the end of its expected lifespan, replacement might be better.
- Extent of Damage: Structural issues often warrant replacement for safety reasons.
- Upgrade Opportunities: Replacing old racks allows you to upgrade to newer, potentially more efficient models.
In conclusion, overhead garage ceiling racks do require some ongoing maintenance, the costs are generally minimal compared to the benefits they provide. By following a regular maintenance schedule and addressing issues promptly, you can ensure your investment lasts for many years, providing valuable storage space and organization to your garage.
In the next section, we’ll explore alternatives to overhead garage racks and compare their costs, helping you make the most informed decision for your storage needs.
Alternatives to Overhead Garage Racks
While overhead garage racks offer an excellent storage solution, they’re not the only option available. Let’s explore some alternatives and compare their costs, benefits, and drawbacks to help you make an informed decision about the best storage solution for your garage.
1. Wall-Mounted Shelving Systems
Wall-mounted shelves provide vertical storage without utilizing ceiling space.
Costs:
- DIY Installation: $100 – $300 per 8-foot section
- Professional Installation: $200 – $500 per 8-foot section
Pros:
- Customizable and modular
- Easy access to items
- Can be installed at various heights
Cons:
- Takes up wall space
- May not be suitable for very heavy items
- Limited by available wall area
2. Free-Standing Shelving Units

These are standalone units that don’t require installation.
Costs:
- Basic Metal Shelving: $50 – $150 per unit
- Heavy-Duty Industrial Shelving: $200 – $500 per unit
Pros:
- No installation required
- Easily movable
- Available in various sizes and weight capacities
Cons:
- Takes up floor space
- May not be as stable as mounted options
- Can be less visually appealing
3. Cabinets and Lockers

Enclosed storage options provide a cleaner look and protect items from dust.
Costs:
- Basic Garage Cabinets: $200 – $500 per unit
- High-End Garage Cabinet Systems: $1,000 – $5,000+
Pros:
- Conceals clutter
- Protects items from dust and pests
- Can be locked for security
Cons:
- More expensive than open shelving
- Takes up floor space
- Limited visibility of stored items
Cost Comparison with Overhead Racks
Let’s compare the costs of storing approximately 64 cubic feet of items (equivalent to a 4′ x 8′ overhead rack):
| Storage Solution | Average Cost | Installation | Total Cost |
|---|---|---|---|
| Overhead Rack (4′ x 8′) | $250 – $500 | $150 – $300 | $400 – $800 |
| Wall-Mounted Shelving (8′ section) | $150 – $300 | $50 – $200 | $200 – $500 |
| Free-Standing Shelving (4 units) | $200 – $600 | $0 | $200 – $600 |
| Garage Cabinets (2 large units) | $400 – $1,000 | $100 – $300 | $500 – $1,300 |
Factors to Consider When Choosing an Alternative
- Available Space: Assess your garage’s layout to determine which solution fits best.
- Type of Items to Store: Consider the weight, size, and frequency of use of the items you need to store.
- Budget: Factor in both initial costs and potential long-term savings.
- Aesthetics: Some solutions offer a cleaner, more organized look than others.
- Flexibility: Consider how easily the storage solution can be modified or moved in the future.
- Accessibility: Think about how easily you’ll be able to reach and retrieve stored items.
Combining Solutions for Optimal Storage
Many homeowners find that a combination of storage solutions works best. For example:
- Overhead Racks: For long-term, seasonal storage
- Wall-Mounted Shelves: For frequently used items
- Free-Standing Units: For tools and equipment
- Cabinets: For valuable or sensitive items
Case Study: Mixed Storage Solution A homeowner in Austin, Texas, implemented a mixed storage solution:
- 1 Overhead Rack (4′ x 8′): $600
- 2 Wall-Mounted Shelving Units: $400
- 1 Free-Standing Shelving Unit: $150
- 1 Small Cabinet: $300
Total Cost: $1,450
This combination provided 100+ cubic feet of storage while utilizing all available space efficiently.
DIY vs. Professional Installation Across Alternatives
| Storage Solution | DIY Difficulty | Pro Installation Cost |
|---|---|---|
| Overhead Racks | Moderate-High | $150 – $300 |
| Wall-Mounted Shelving | Low-Moderate | $50 – $200 |
| Free-Standing Shelving | Very Low | N/A |
| Cabinets | Moderate | $100 – $300 |
Conclusion: Choosing the Right Solution
While overhead garage storage racks offer excellent space-saving benefits, they may not be the best solution for everyone. Consider these factors when making your decision:
- Budget: If cost is a primary concern, wall-mounted or free-standing shelves might be more economical.
- Space Utilization: Overhead racks are unbeatable for utilizing unused ceiling space.
- Flexibility: Free-standing units offer the most flexibility for changing layouts.
- Storage Needs: For a mix of long-term and frequently accessed storage, a combination of solutions might be ideal.
- DIY Capability: If you’re handy, wall-mounted shelving offers a good balance of cost-savings and effectiveness.
By carefully considering your specific needs, budget, and garage layout, you can choose the storage solution—or combination of solutions—that works best for you. Remember, the goal is to create an organized, functional space that meets your storage needs while staying within your budget.
Frequently Asked Questions: Common Questions About Overhead Garage Rack Costs
To help address any remaining concerns or queries you might have about installing overhead garage racks, let’s go through some frequently asked questions:
How long does installation typically take?
The installation time for overhead garage racks can vary depending on several factors:
- DIY Installation:
- 1 rack: 3-6 hours
- 2-4 racks: 6-12 hours
- Professional Installation:
- 1 rack: 1-2 hours
- 2-4 racks: 2-4 hours
Note: These are estimates. Actual time may vary based on experience level, garage conditions, and rack complexity.
Can overhead racks be installed in any garage?
While overhead racks are versatile, there are some limitations:
- Ceiling Height: Ideally, your garage should have a minimum ceiling height of 8 feet.
- Ceiling Material: Most racks are designed for wood joists, but solutions exist for metal or concrete ceilings.
- Joist Spacing: Standard racks are designed for 16″ or 24″ joist spacing. Custom solutions may be needed for different spacings.
Pro Tip: Always check your garage’s specifications against the rack manufacturer’s requirements before purchasing.
Do I need permits for installing overhead garage racks?
Permit requirements vary by location:
- Many areas don’t require permits for simple storage installations.
- Some localities may require permits for any structural changes to the garage.
Best Practice: Check with your local building department or homeowners association before installation.
How much weight can overhead garage racks hold?
Weight capacity varies by product:
- Light-Duty Racks: 150-250 lbs
- Medium-Duty Racks: 250-450 lbs
- Heavy-Duty Racks: 450-600+ lbs
Important: Always check the manufacturer’s specifications and never exceed the recommended weight limit.
Are there financing options available for overhead garage rack installation?
Yes, several financing options may be available:
- Home Improvement Store Financing: Many large retailers offer credit cards with 0% interest for 6-18 months.
- Personal Loans: Banks or online lenders offer personal loans for home improvements.
- Home Equity Line of Credit (HELOC): For larger garage renovation projects.
- Manufacturer Financing: Some rack manufacturers offer financing options.
Example: Home Depot Consumer Credit Card
- 0% interest if paid in full within 6 months on purchases of $299 or more
- Project Loan option for larger purchases up to $55,000
What’s the difference in cost between adjustable and fixed racks?
Generally, adjustable racks are more expensive:
- Fixed Racks: $100 – $300 per 4′ x 8′ section
- Adjustable Racks: $150 – $400 per 4′ x 8′ section
The price difference is due to the additional hardware and complexity of adjustable systems.
Can I install overhead racks in a garage with a low ceiling?
Yes, but with limitations:
- Minimum Height: Most manufacturers recommend at least 16-18 inches of space between the ceiling and the top of items stored.
- Low-Profile Options: Some companies offer racks designed for garages with ceilings as low as 7 feet.
Cost Impact: Low-profile or custom solutions may cost 10-20% more than standard racks.
How does the cost of overhead racks compare to building a shed for storage?
Let’s compare the costs:
| Storage Solution | Average Cost | Pros | Cons |
|---|---|---|---|
| Overhead Racks (4 large units) | $1,600 – $3,200 | – No additional land use – No permits usually required – Quick installation | – Limited by garage size – May affect garage use |
| Small Shed (8′ x 10′) | $3,000 – $5,000 | – Separate storage space – Can be customized | – Requires yard space – May need permits – Higher cost |
Are there any hidden costs I should be aware of?
While not common, some potential additional costs include:
- Ceiling Reinforcement: If your ceiling joists aren’t strong enough ($200 – $500)
- Electrical Work: If you need to move light fixtures ($100 – $300)
- Painting: Touch-ups after installation ($50 – $100)
- Storage Containers: For organizing items on the racks ($50 – $200)
How often do overhead garage racks need to be replaced?
With proper installation and maintenance:
- Steel Racks: 20-30 years
- Aluminum Racks: 30+ years
Factors Affecting Lifespan:
- Quality of materials and installation
- Weight of stored items
- Garage environment (humidity, temperature fluctuations)
By addressing these common questions, we hope to have provided you with a comprehensive understanding of the costs and considerations involved in installing overhead garage racks. Remember, while the initial investment may seem significant, the long-term benefits of improved organization and space utilization often outweigh the costs for many homeowners.
Conclusion
As we wrap up our comprehensive guide on the costs of installing overhead garage racks, let’s recap the key points and provide some final thoughts to help you make an informed decision.
Recap of Cost Factors
- Initial Costs:
- DIY Installation: $100 – $500 per rack
- Professional Installation: $300 – $1,500+ per rack
- Factors Influencing Cost:
- Rack size and material
- Installation complexity
- Brand and quality
- Geographic location
- Long-term Considerations:
- Maintenance costs: Generally low, $20 – $50 annually
- Potential repairs: $50 – $500 depending on the issue
- Lifespan: 20-30+ years with proper care
Balancing Cost with Quality and Safety
When considering overhead garage racks, it’s crucial to strike a balance between cost-effectiveness and quality:
- Safety First: Never compromise on the weight capacity or installation quality to save money. The safety of your family and possessions is paramount.
- Quality Pays Off: Higher-quality racks may cost more upfront but often last longer and require less maintenance.
- Professional vs. DIY: While DIY can save money, professional installation ensures proper setup and may come with warranties.
Making Your Decision
Consider these factors when deciding whether to install overhead garage racks:
- Space Needs: Assess your current and future storage requirements.
- Budget: Determine what you can comfortably afford, including potential long-term costs.
- Garage Structure: Ensure your garage can support overhead racks.
- DIY Skills: Honestly evaluate your ability to safely install the racks yourself.
- Long-term Plans: Consider how long you plan to stay in your current home.
Getting Multiple Quotes
We strongly encourage getting multiple quotes before making a decision:
- Aim for at least 3-5 quotes from different providers.
- Compare not just prices, but also:
- Quality of materials
- Installation process
- Warranties offered
- Customer reviews and reputation
Pro Tip: Use our guide as a reference when discussing options with installers. Being informed can help you negotiate better deals and avoid unnecessary upsells.
Final Thoughts
Installing overhead garage racks is an investment in your home’s functionality and organization. While the costs can vary widely, the benefits of maximized space and improved organization often outweigh the initial expense for many homeowners.
Remember:
- Cheaper isn’t always better when it comes to safety and longevity.
- Professional installation might save you money in the long run by avoiding costly mistakes.
- Consider your specific needs and garage layout when choosing a storage solution.
By thoroughly researching your options, getting multiple quotes, and carefully considering your needs and budget, you can make an informed decision that will provide you with efficient, safe storage for years to come.
Next Steps
If you’re ready to move forward with installing overhead garage racks:
- Measure your garage and assess your storage needs.
- Research local providers and gather quotes.
- Check local regulations regarding permits if necessary.
- Plan your installation timeline, considering seasonal factors that might affect the process.
- Prepare your garage by clearing the space and addressing any pre-installation requirements.
Remember, a well-organized garage not only improves your daily life but can also add value to your home. Whether you choose overhead racks or another storage solution, the key is to create a system that works for your specific needs and lifestyle.
Thank you for following this comprehensive guide on the costs of installing overhead garage racks. We hope this information helps you make the best decision for your home and storage needs.