
Cladding your garage door can be a fun and interesting project to embark on during the weekend. It is also an excellent way to improve the curb appeal of your home. That’s because the garage door is the most visible and eye-catching part of your home.
If you have always loved how wood garage doors look and don’t want to make a hefty investment purchasing one, this post is for you. You will learn how to clad your garage door with wood, and I’m going to make it as newbie-friendly as possible. Avid DIY’ers will find it very straightforward to follow this guide as well. Also, it doesn’t matter the material used for the garage door. Whether you own steel, aluminum, vinyl, wood, or veneer garage doors, this process is the same. So let’s get into it.
The five-step process to cladding a garage door is
- Pick the wood of choice
- Prepare the wood
- Remove the garage door
- Clad the wood on the garage door panels
- Reinstall the garage door
We will look at each step and explain how to go about it the right way, so you get a professional-looking clad garage door at the end of the day. But before we do, let’s take a look at some of the benefits of timber cladding. Why would you even want to consider cladding your garage door with wood?
Benefits of wood garage door cladding
Wood is not the only material used for cladding garage doors. In fact, there are about five different materials that can be used. You can find out more about the different material options available for garage doors in our introduction post on garage door cladding.
Wood is, however, the most popular option out there. Homeowners love it. But why is it so? Let’s explore some of the reasons below.
Naturally beautiful
First of all, there is something about wood that gives your home a warm and organic touch. Cladding your garage door with timber is one way to make it more appealing and beautiful in the most natural way.
Versatile
If you are creative enough, there are several custom designs you can come up with for your garage door. Wood makes that design possible. That’s because they can be cut in different shapes and sizes and arranged in any way you like.
There are several types of wood to choose from, and they all come in different shades, colors, and grain. Chances are you’ll find something that is eye-catching and works with your home’s color palette.

If you want to enhance the wood’s appearance, you can stain it to give it a new look. Also, if the natural timber look isn’t something you are really into, you can paint it to match the rest of your home.
Thermally efficient
Cladding your garage door with wood is one sure way to improve the insulation in your garage. They have a feature of keeping a room cold in hot weather conditions and keeping the place warm when it’s freezing. In the long run, you’ll save on heating and cooling costs.
Not only does it improve insulation, but it also reduces the street noise that gets into your garage. Timber is excellent for filtering out unwanted noise to help to keep your home. This is particularly helpful if your garage is used as a man cave, home office, or living space.
Disadvantages of wood garage door cladding
Going for timber for cladding your garage door has many benefits, as you can already tell. However, there are a few disadvantages of wood you need to be aware of. This is important because it gives you an idea of the possible problems you might face and how to go about them.
It deteriorates over time.
Since the wood will be exposed to different weather conditions over time, it begins to slowly deteriorate in strength. Rainfall, snow, and sunshine all contribute to this.
To keep the wood in its pristine condition, you must perform routine maintenance on it, at least once a year. Staining is a great way to keep the wood in good condition for an extended period.
It can be expensive
Depending on the type of wood you choose, the design, and the garage door’s size, wood cladding can be expensive.
Cladding a garage door with wood – step-by-step
Now that we’ve got all of that out of the way, let’s talk about how to clad your garage door from start to finish.
As I mentioned in the beginning, the first step is to select the wood of choice, and then purchase and prepare the wood, make it suitable for cladding the garage door. After that, we uninstall the garage door from the frame. The next thing is to actually clad the garage door panels with the lumber boards, and then reinstall the garage door after it’s done. This sounds like a lot, but let’s take it one step at a time.
1. Choosing a wood type for garage door cladding
There are quite a lot of timbers available, and for someone who doesn’t know anything about woods, it can be a daunting task to select the right one for a project. When it comes to garage door cladding, there are three main factors to consider when choosing a timber. And they are durable, weather-resistant, and have overall weight.
You want to go for a wood that can withstand pressure and damage, able to withstand harsh weather conditions to some extent, and doesn’t weigh a ton.
A lightweight timber is crucial because cladding will contribute to the garage door’s overall weight. If the weight change is substantial, you may have to change your garage door spring to a bigger one, so it can counterbalance the additional weight. In extreme cases, you may have to upgrade your garage door opener to a version with more horsepower. We definitely don’t want that extra cost.
Here are the two most common kinds of wood used for garage door cladding
Cedar

Cedar is, undoubtedly, one of the most popular timbers out there. They are used in a wide array of projects, and cladding is no exception.
One remarkable property that makes Cedar excellent for cladding garage doors is that it is lightweight. It doesn’t weigh a ton. Cedar also does exceptionally well in diverse weather conditions. Unlike many other timbers, it doesn’t deteriorate much in different weather conditions. This makes it ideal for cladding since the garage door is exposed to the elements.
Cedar (on Amazon) is also an excellent choice because it can handle nailing and screws very well. It doesn’t split or break when you nail or screw it. This is a property you want in timber for garage door cladding. Because, for a better grip on the surface, nailing or screwing is essential.
Siberian Larch
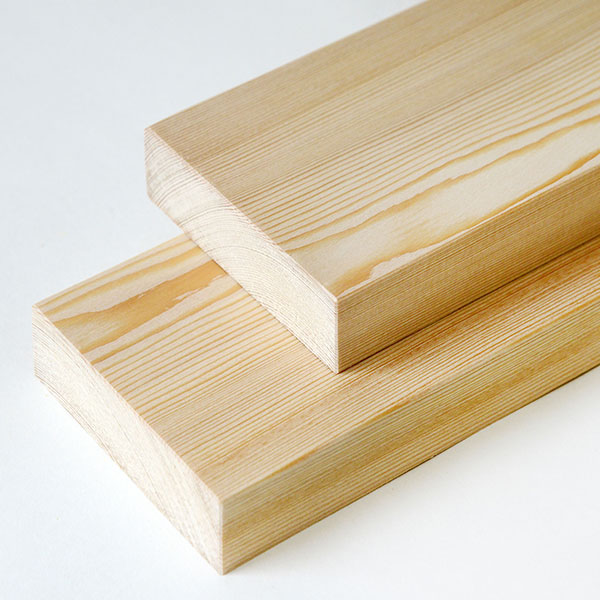
The Siberian Larch has similar properties as the Cedar. This means it is also prone to weathering and works very well with nails and screws. This makes it excellent for cladding.
The only difference between Siberian Larch and Cedar is, that the former is a bit denser. That is both an advantage and a disadvantage. The advantage is, that it can withstand knocks and scratches more, and the disadvantage is your garage door will be heavier.
Amount of Lumber boards required.
Now that you are familiar with the two most used timber for cladding, how many boards do you actually need to completely clad your garage door? This is an important section, so I recommend you take notes.

The two critical measurements you need to know are the garage door panel’s height and width. The standard width for single garage doors is 8 feet, which is equivalent to 96 inches. For double garage doors, the standard width is 16 feet, which is equivalent to 192 inches.
Garage door panels come in three standard heights: 18 inches, 21 inches, and 24 inches.
Why are these measurements necessary? When you go out shopping for lumber boards, you want to find a board that has the same dimensions as your garage door’s panel (highly unlikely) or a combination of lumber boards, which will sum up to have the same dimensions as the panel. After that, you multiply that by the total number of panels on your garage door to know the exact number of boards required (most likely)
For instance, let’s say you own a single garage door with four panels, just as in the photo above. Also, let’s assume the Panel Height is 18 inches, which is one of the standard garage door panel heights. As already mentioned, single garage doors are 8 feet or 96 inches wide.

To fully clad this panel, you’ll have to find lumber boards, which, when combined, can have the same dimensions as that of the panel.
A perfect example is this Eastern Red Cedar lumber (on Amazon), which I highly recommend. It has a height of 6″, 48″ wide, and 3/4″ thick. This means it requires six of them to fully clad the panel.
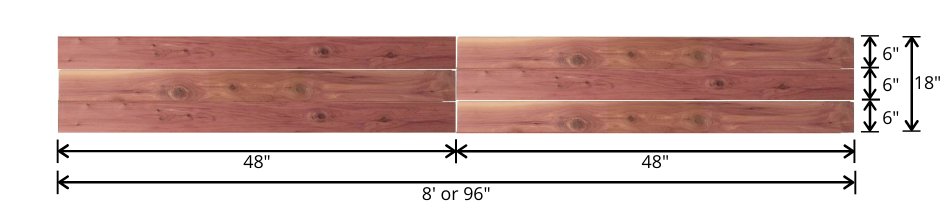
The photo above explains how to properly arrange this lumber on the garage door panel to fully clad it. You’ll do the same thing for all the other panels. So, to know the total number of boards required, simply multiply the number of boards used for a single panel by the total number of panels.
For a double garage door, which is 16ft wide, it will require 12 lumber boards per panel. That is if you are going for the Eastern Red Cedar lumber board mentioned. The thing is, if you find a lumber board with the perfect dimensions as the one mentioned, there will be no need to prepare the wood before you install it on your door. You can install it immediately when it arrives. That can save you some trouble and time.
2. Preparing the wood
As I mentioned earlier, finding an already prepared lumber with the right dimensions is always the best choice for newbies. And the Eastern Red Cedar (Amazon) is a great option for this project. However, there will be a few instances where they may not be perfect. Your panels may be slightly taller than the standard height, or anything. If that’s the case, then you need to have custom-sized lumber boards made for you.
Preparing the wood for this project involves cutting the lumber into the right dimensions to fit your garage door panels. If you have no experience with woodworking, I recommend you let a professional do it for you.
Go to the lumber store with your garage door panel’s dimensions, and explain to the expert what you intend to use it for. Specifically request for a Cedar or a Sirbach Larch timber, and the thickness of the lumber should be anywhere between 1/2″ and 1″.
Another thing you can do to prepare the wood is to stain it. Wood stain is an excellent way to change the color of the wood while still maintaining the natural timber look, according to DoItYourself. You can have your wood in any color to match your home aesthetics with wood staining.
They have other functional benefits, as well. Since the wood will be exposed to the elements, applying a wood stain will protect it from sunlight, and make it more water-resistant, and a wood stain product like the DEFY Extreme Wood Stain (Amazon), protect the wood from rotten.
3. Remove the Garage Door
Now that we have our lumber boards prepared and ready to go, the next thing is to uninstall the garage door. To properly clad the wood on the garage door, and make the process as painless as possible, you have to remove the garage door panels.
This is the trickiest part of the entire process, in my opinion. Hire a professional to take it down if you find the entire process complicated. However, if you decide to do it, I recommend you find someone to help you out. Follow the steps outlined in this video to remove the garage door.
3. Clad the wood on the garage door panels
The moment we have all been waiting for :D. Now that you’ve got on the garage door panels removed and on the floor, it’s finally time to clad the lumber boards on the garage door panels. Here is the entire process summarized in bullet points.
- Arrange the lumber boards on the garage door panel, so they align properly
- Apply adhesive on the garage door panel and attach the lumber boards, one at a time
- Screw the lumber boards into the panel
- Repeat the same process for the other lumber boards and panels
Arrange the lumber boards on the garage door panels
I think this is self-explanatory. You want to properly place the boards on the garage door panels, so they fit perfectly. Leave no redundant spaces on the panel, unless it’s a design choice. If the lumber boards were properly cut, and in the right dimensions, this would not be a hassle.
Apply adhesive on the garage door panel and attach lumber boards

Take the lumber off the panel, one at a time, and apply glue on the garage door panel’s surface. If you are looking for recommendations, Titebond 3 (on Amazon) is an excellent adhesive for this kind of project. That’s because it’s water-resistant, works extremely well in diverse conditions, and is strong enough to stand any impact on the boards. It takes a while to fully dry as well. Which means they are easier to work with. The 32-ounce bottle should be more than enough for the entire project.
Once you are done, attach the lumber board back on the panel, and make sure it is properly aligned as before. Repeat the same thing for all the other boards.
Screw the lumber boards to the panel

You want to use a screw that is long enough to go through the lumber boards and reach the garage door panel. The length of the screw will depend on the thickness of the boards and the panels. Anything between 1″ and 2″ should be good enough.
Also, you will need a drill driver or an impact driver to drive the screws into the boards. An impact driver is recommended because it won’t take much effort to drill.
Once you have all the necessary tools available, simply screw all the four sides of the lumber boards into the panels. Do this one board at a time. Repeat the same thing for the other boards.
At this point, all you need to do is repeat the same steps for all the other garage door panels. Clad them perfectly, as explained in this section. After that, wait for about three hours for the glue to dry, and then move on to the next step.
4. Reinstall the garage door
Once the cladding process is complete, it’s time to reinstall the garage door. As always, if you find this process overwhelming, then hire a professional to do it for you. However, if you are up for the task, follow the steps outlined in the video below to reinstall the garage door.
Conclusion
Cladding your garage door can be an interesting project for the weekend. By the end of this project, you would have learned a thing or two about woodworking. Share if you found this useful