
Considering insulating your garage? You’re likely wondering about the investment involved. Understanding the typical cost to insulate a garage is the first step in planning your project.
While the national average for insulating a garage in the U.S. is around $4,700, this figure can vary significantly. Most homeowners find their total cost falls within a range of $1,900 to $7,700 for the total project.
This wide range highlights that the cost of insulating a garage isn’t a one-size-fits-all number. It’s influenced by several important factors specific to your garage and your goals for the insulation project.
Several key elements play a significant role in determining the final garage insulation cost.
One of the biggest factors is the size of the garage. Naturally, a larger garage has more surface area on the garage walls and garage ceiling that needs to be covered with insulation material, requiring more product and labor.
The type of garage also matters – an attached garage that shares walls with your house might have different insulation needs compared to a completely detached garage.
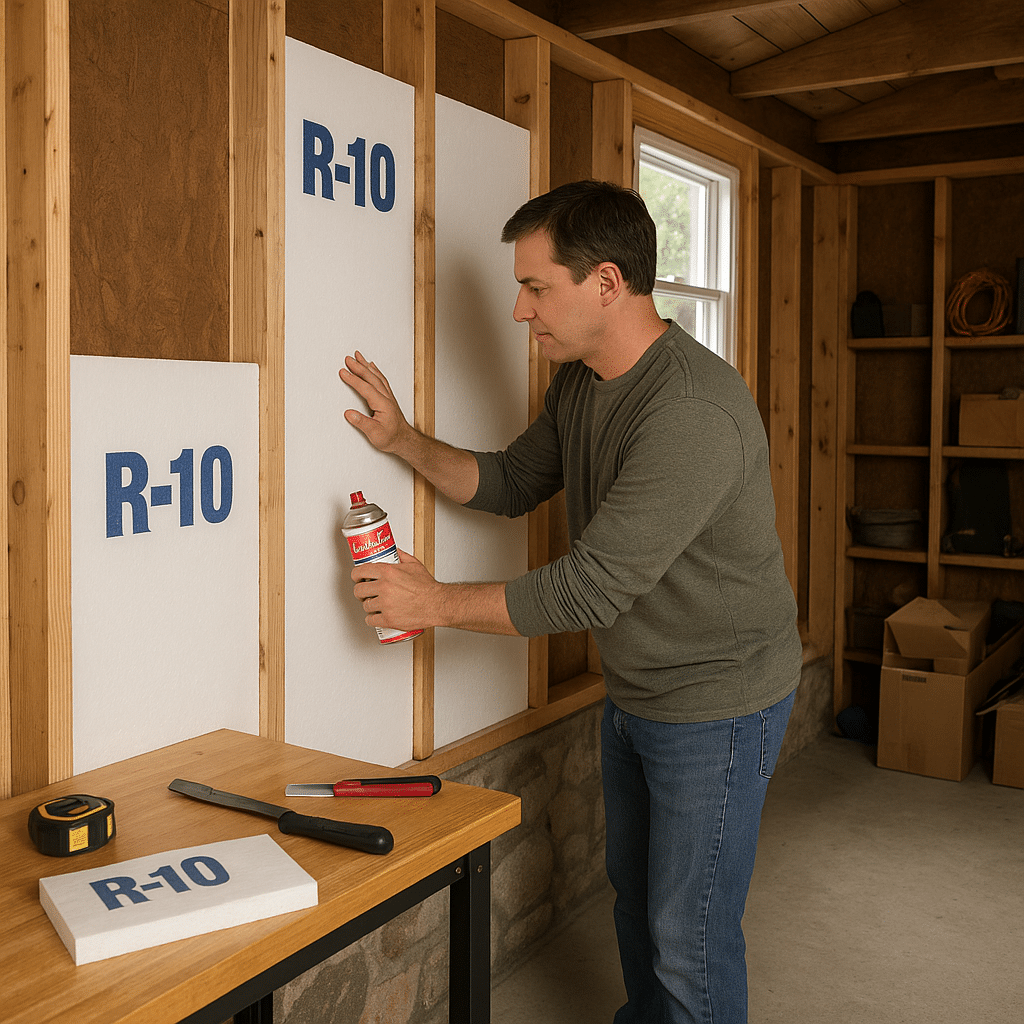
Beyond size and structure, the insulation type you choose has a major impact on the overall expense. Different materials, such as fiberglass batts, blown-in insulation, or spray foam insulation, come at vastly different price points per square foot and require different installation methods.
Your approach to installing insulation also affects the total cost. Deciding whether to do the work yourself as a DIY garage project or hire a professional for installation will significantly impact the labor cost.
Regional labor rates and even climate requirements for adequate R-value can subtly influence how much it costs to insulate your garage. Planning carefully and considering these factors from the outset will give you a much clearer picture of the potential cost to insulate a garage for your specific situation.
Garage Size and Type: How It Impacts the Cost to Insulate Your Garage
The physical characteristics of your garage are major determinants of the final garage insulation cost. The size and configuration, specifically whether it’s a single, double, or three-car garage and if it’s attached to your home or a standalone structure, significantly influence the amount of insulation material needed and the complexity of the installation. This directly affects the overall expense of insulating a garage.
Cost by Garage Size
Garage Insulation Cost Calculator
Get estimated cost ranges based on your garage size
🔧 DIY Estimate
$600 – $1,500
👷 Professional Estimate
$1,500 – $4,000
💡 Important Notes:
These prices are estimates for fiberglass insulation. Add $800-$3,000 for spray foam insulation or if insulating finished walls.
A larger garage means more square footage to insulate, leading to higher material and labor costs.
- Single-Car Garage: If you’re looking to insulate a single-car garage, which typically has a floor area of around 200-300 sq. ft., the cost for insulating the walls and ceiling can vary widely. On the low end, a simple DIY garage insulation job using fiberglass batts might cost around $600. However, hiring a professional to install high-end spray foam insulation could push costs to $3,000 or more. HomeGuide estimates the range for insulating the walls and ceiling of a 1-car garage (12’x24′) to be about $500-$2,900.
- Double-Car Garage: A two-car garage naturally presents a larger project due to its greater surface area (approx. 400-600 sq. ft.). Typical costs for insulating a two-car garage’s walls and ceiling range from around $800 up to $5,000+. National averages for a 2-car (24’x24′) garage insulated professionally range about $800-$5,100, depending on the insulation type. A DIY approach with budget materials might keep the garage insulation cost near $800-$1,500, but professional installation of premium insulation could run a few thousand dollars. Angi reports a broad normal range of roughly $1,500-$6,700 for a two-car garage insulation project.
- Three-Car Garage: For larger structures like three-car garages (e.g., ~24 ‘ x36’), the costs scale up further. You might expect a range from about $1,000 on the low end for basic insulation up to $6,000-$13,000 for a top-end professional job using high-cost materials. The upper end assumes a large area with professional installation of premium insulation material. Each additional bay adds significant square footage, impacting the overall cost.
Attached vs. Detached Garage Costs
Whether your garage is attached to your home or is a freestanding structure also influences the insulation scope and potential costs.
- An attached garage shares one or more walls (and possibly the ceiling if there’s a room above) with the conditioned space of your house. These shared surfaces might already have some existing insulation as part of the home’s envelope, potentially reducing the amount of new insulation needed. Insulating an attached garage can directly improve comfort in adjacent interior rooms and is often prioritized for energy savings.
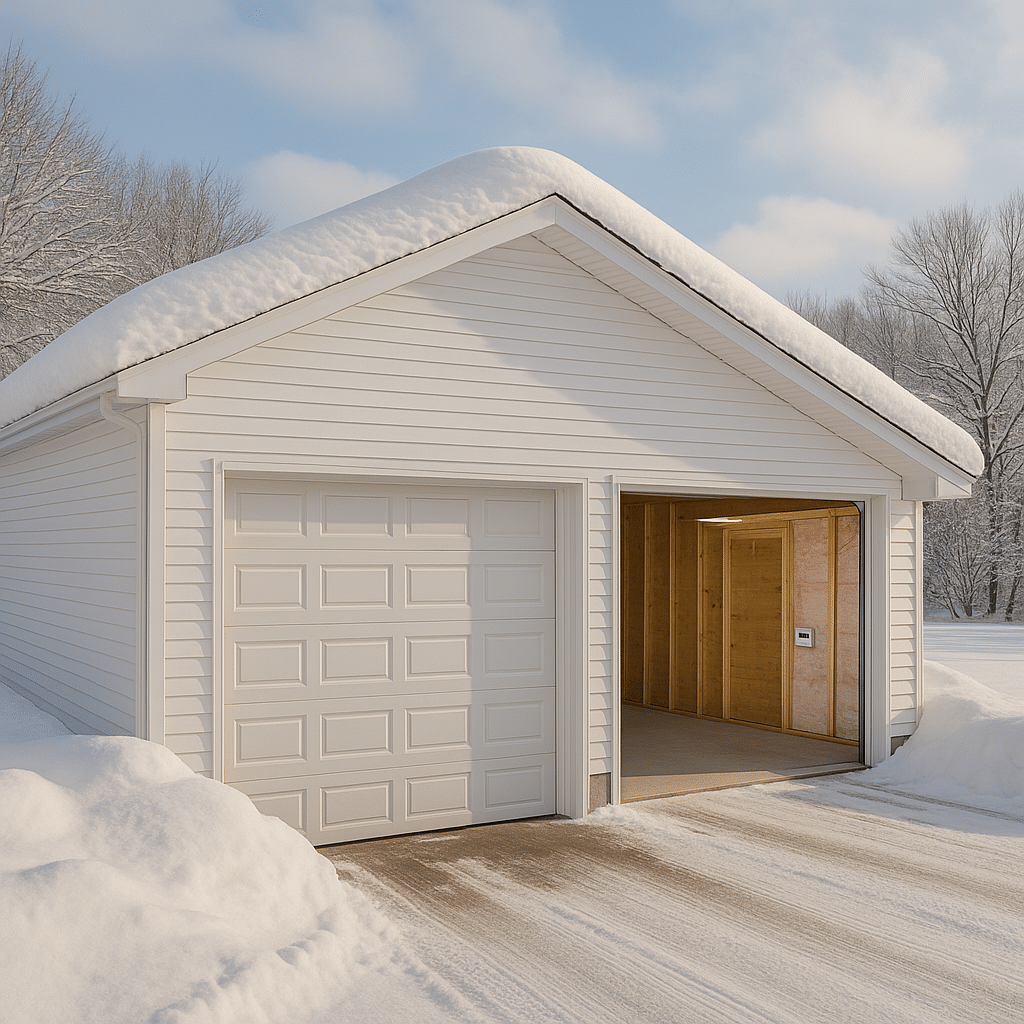
- A detached garage, on the other hand, has all its walls exposed to the outside. This means you’ll typically need to insulate all four walls plus the ceiling, leading to higher material costs. While insulating a detached garage may not directly save on your home’s energy bills if it’s unheated, it makes the space more usable year-round and protects stored items. In summary, attached garages may cost approximately 10-20% less to insulate than equivalent-sized detached garages due to less surface area needing coverage and potentially lower required R-value on the house-facing side.
Finished vs. Unfinished Garages
The current state of your garage’s interior walls also affects the labor and method of insulation.
- Insulating an unfinished garage (where wall studs are exposed) is generally easier and cheaper. You can simply fit the insulation material directly into the open wall cavities.
- Insulating an already finished garage (with drywall in place) adds to the labor cost. The drywall either needs to be removed and replaced, or insulation must be blown in through drilled holes, which then require patching. For instance, insulating a finished 2-car garage could cost anywhere from $1,600 up to $12,800 (including removing/replacing drywall), significantly higher than the $800-$5,100 range for an unfinished garage of the same size. Keep in mind that removing drywall to insulate means you’ll also incur drywall installation and finishing costs, which can add another $800-$5,000, depending on size and finish level.
Insulating Garage Doors and Sealing Gaps

Don’t overlook the garage door and other openings when planning your insulation project. Insulating the walls and ceiling while leaving a thin, uninsulated metal garage door can still result in significant heat loss.
Many garage insulation projects include insulating the garage door or upgrading to an insulated door. Adding insulation to an existing 2-car door using a DIY kit or foam panels costs about $90-$530 for materials. Buying a new insulated garage door is a higher expense, running around $1,500-$3,700 installed for a 2-car door.
Additionally, weatherstripping around the garage door and any side entry doors is a relatively low-cost but crucial step for sealing drafts, typically costing around $10-$30 in materials per door. These door-related costs are often add-ons but significantly improve the overall effectiveness of your insulation project.
Comparing Insulation Materials and Their Costs: What Type of Insulation is Right for Your Garage?
Insulation Materials Comparison
Compare R-value, cost, and DIY difficulty of garage insulation options
Bubble size indicates DIY difficulty:
Easy ↔ Difficult
* Reflective Foil doesn’t have a meaningful R-value on its own but can create an effective R-3 to R-6 when properly installed with air gaps.
When it comes to insulating your garage, you have several material options, each with its own set of characteristics, performance levels, and price tags. The type of insulation you choose will significantly impact the cost of insulating your garage, as well as the effectiveness of the insulation in regulating temperature. Understanding the different insulation materials is key to making an informed decision for your specific needs and budget.
Here’s a look at the most common types of insulation materials used for garages, comparing their costs, R-values, pros, cons, and typical use cases:
Fiberglass Batt Insulation
Fiberglass batts are perhaps the most classic and widely recognized form of insulation. Made of spun glass fibers, they come in rolls or panels designed to fit snugly between wall studs or ceiling joists.
- Cost to Insulate: Fiberglass is generally the most affordable option. The material cost is typically around $0.50-$1.00 per sq. ft. for batts. If you hire a professional to install insulation, the cost averages about $0.80-$2.60 per sq. ft., including labor. DIY installation is very feasible with fiberglass, and you’ll mainly pay for materials.
- R-value for Garage: Approximately R-3 to R-4 per inch. A standard 3.5″ wall batt is about R-11 to R-15, and a 6″ ceiling batt around R-19. Higher-density batts can reach higher R-values.
- Pros: Affordable and widely available, easy to cut and install for DIYers, works well in open-framed walls and ceilings, low upfront cost, non-combustible, won’t rot or attract pests, provides decent insulation for the cost.
- Cons: Lower R-value per inch than some alternatives, less effective if compressed or gapped, can lose effectiveness if it sags or settles, does not air-seal, requires protective gear for handling due to fiber irritation, loses insulation value and may support mold if wet.
- Use Cases: Excellent for walls and ceilings in unfinished garages where studs are exposed. It’s often used when the garage will be finished with drywall afterward. An economical choice to reach standard R-13 to R-19 levels in garages.
Blown-In Cellulose Insulation
Cellulose insulation is a loose-fill material primarily made from recycled paper fibers treated for fire resistance. It’s commonly blown into attics or wall cavities.
- Cost to Insulate: Cellulose is also relatively low-cost, comparable to or slightly more than fiberglass. Typical prices range from about $0.75 to $1.50 per sq. ft. installed. If you DIY, material cost might be roughly $0.40-$0.70 per sq. ft. plus blower rental.
- R-value for Garage: Roughly R-3.2 to R-3.8 per inch, similar to or slightly higher than fiberglass. A thick layer in a garage ceiling can easily achieve R-30+.
- Pros: Higher R-value per inch than fiberglass batts, eco-friendly (made from recycled paper), fire-retardant additives, fills gaps well, good sound insulation.
- Cons: Settling can occur over time, slightly reducing R-value, prone to absorbing moisture if there are leaks or high humidity, installing in closed walls requires drilling and patching holes, does not air-seal cracks.
- Use Cases: Prime use is for attic insulation above a garage (or the garage ceiling). Also used for insulating finished garage walls by drilling and filling. A cost-effective retrofit option for closed walls.
Spray Foam Insulation (Open-Cell and Closed-Cell)
Spray foam insulation is a two-part liquid that expands into a foam, effectively filling cavities and sealing air leaks. It comes in open-cell (lighter) and closed-cell (denser) forms.
- Cost to Insulate: This is the most expensive insulation upfront. Open-cell costs about $1.50 to $3.50 per sq. ft. installed. Closed-cell is pricier, around $1.75 to $4.50+ per sq. ft. installed. To insulate a 2-car garage walls and ceiling with spray foam might cost on the order of $3,000-$8,000. HomeGuide estimates the range for a 2-car garage at about $4,100-$11,900. Professional installation is almost always required.
- R-value for Garage: Roughly R-3.5 to R-4 per inch for open-cell, and R-6 to R-7 per inch for closed-cell. Closed-cell also acts as a vapor barrier when applied thickly.
- Pros: Highest R-value per inch, provides air sealing, closed-cell provides a moisture barrier, can strengthen the structure, doesn’t settle or sag, great for odd-shaped or hard-to-reach areas, best thermal performance for climate-controlled garages or conversions.
- Cons: High cost is the biggest drawback, installation is messy and requires expertise, professional installation is required, produces chemical off-gassing during curing, requires a thermal barrier (like drywall) for fire safety.
- Use Cases: Use where maximum insulation is needed or space is limited and budget is less a concern. Examples include insulating a garage ceiling under living space, actively heated/cooled garages, metal garages or pole barns (closed-cell), attached garages in very cold regions for superior air sealing, or when finishing the garage as a livable room.
Rigid Foam Board Insulation
Rigid foam boards are panels of foam insulation made from materials like EPS, XPS, and Polyiso. They come in various thicknesses and can be cut to fit between studs or applied over framing.
- Cost to Insulate: Moderately expensive, generally costing more than fiberglass or cellulose but less than spray foam. Material cost is around $0.70-$1.50 per sq. ft. for 1″ thick boards. Installed costs are around $1.20-$3.70 per sq. ft.. DIY installation is possible.
- R-value for Garage: Roughly R-3.5-R-4 per inch for EPS, R-5 per inch for XPS, and R-6 to R-6.5 per inch for Polyiso.
- Pros: Higher R-value per inch than fibrous batts, serves as a moisture barrier (especially XPS and Polyiso), can block air flow if sealed, lightweight and easy to handle, great for insulating garage doors and masonry/concrete walls, can be layered with other insulation.
- Cons: More expensive per R-value than batts, doesn’t fill irregular spaces as well, achieving high R-values in thin framing can be challenging, most types need a thermal barrier (drywall) for fire safety, vulnerable to UV light if left uncovered, pests can burrow into them.
- Use Cases: Excellent for insulating garage doors and concrete block or slab walls where moisture is a concern. Can be used between studs in unfinished garages (check code). Often combined with other insulation types. Useful in areas needing moisture tolerance or extra R in a thin profile.
Reflective (Radiant Barrier) Insulation
Reflective insulation, or radiant barriers, are foil-faced materials designed to reflect radiant heat. They might be foil-faced rolls, bubble wrap, or foam sheets.
- Cost to Insulate: Generally inexpensive. Basic materials cost around $0.10-$0.50 per sq. ft.. Installed costs range roughly $0.30 to $2.00 per sq. ft.. DIY is easy and common.
- R-value for Garage: Technically has no significant R-value on its own; benefits come from reflecting heat. Can achieve an effective R-3 to R-6 when facing an air space.
- Pros: Low cost and straightforward installation, especially effective in hot climates to reflect heat, lightweight and doesn’t add bulk, does not absorb moisture, foil facings can be vapor barriers, can enhance other insulation, improves lighting.
- Cons: Not enough to insulate in cold weather, does little for conductive heat loss, dust can reduce effectiveness, requires an air gap to be effective, usually needs a fire barrier in living spaces, limited winter benefit, does not contribute to soundproofing or air sealing.
- Use Cases: Best suited for hot climates to reduce heat gain. Common in metal garages or pole barns. Often installed in addition to conventional insulation. Popular for garage doors.
Choosing the best insulation type for your garage involves balancing the insulation cost, the required R-value for your climate, and the specific needs of your space (e.g., is it finished, is moisture a concern, will it be climate-controlled?). Each insulation material offers distinct advantages and disadvantages that will factor into your overall garage insulation project.
Cost Range Heatmap: DIY vs. Pro by Insulation Type
| Insulation Type | DIY ($) | Professional ($) |
|---|---|---|
| Fiberglass Batts |
🟩 $400–700
Low cost DIY option. Easy to install for most homeowners with basic tools.
|
🟨 $800–1,500
Medium cost professional installation. Includes labor and materials for standard walls and ceiling.
|
| Cellulose (Blown-In) |
🟩 $500–800
Low cost DIY option. Requires renting a blower machine (~$100/day).
|
🟨 $1,100–1,700
Medium cost professional installation. Best for attics and open spaces.
|
| Spray Foam |
❌ Not Recommended
DIY spray foam kits are expensive and challenging to apply properly. Results often disappoint.
|
🟥 $3,000–6,000+
Highest cost professional installation. Requires specialized equipment and expertise.
|
| Rigid Foam Boards |
🟨 $700–1,000
Medium cost DIY option. Requires careful cutting and sealing for optimal performance.
|
🟧 $1,400–2,000+
High cost professional installation. Includes proper sealing of all joints and gaps.
|
| Reflective Insulation |
🟩 $200–300
Lowest cost DIY option. Simple installation but limited R-value.
|
🟩 $350–550
Low cost professional installation. Often used in combination with other insulation types.
|
DIY vs. Professional Installation: How it Affects the Cost to Insulate a Garage
One of the biggest decisions that will impact the final cost to insulate a garage is whether you decide to tackle the project yourself or hire a professional insulation contractor. Both approaches have their advantages and disadvantages, particularly concerning the overall expense and the complexity of the work involved.
DIY Garage Insulation
Many homeowners consider insulating their garage themselves, especially for certain types of insulation materials.
- Cost Savings: The primary benefit of going the DIY garage insulation route is saving money on labor costs. Labor can account for a significant portion of the total project cost, often 40% or more, ranging typically from $0.30–$1.70 per sq. ft.. By doing the work yourself, you only pay for the insulation materials and necessary tools or equipment. For example, insulating a 400 sq. ft. garage wall with fiberglass might cost ~$200 in materials if you do it yourself, compared to $500 if a contractor does it due to labor markup.
- Feasibility: DIY is most feasible for materials like fiberglass batts, reflective foil, and rigid foam boards. These are relatively straightforward to cut and install.
- More Complex DIY: Blown-in insulation (cellulose or loose-fill fiberglass) is a bit more involved but still manageable for a handy DIYer, particularly for attics where you can rent a blower machine. However, blowing insulation into closed walls is trickier and might be better left to professionals unless you’re comfortable with drilling and patching holes.
- Considerations: If you choose to DIY, remember to use proper safety gear like gloves, eye protection, and a mask, especially when handling fiberglass or cellulose. Ensure you don’t block ventilation and follow product instructions regarding clearance from light fixtures. Also, consider the disposal of any old insulation you remove, which might incur a small fee.
- Pros of DIY: You save money on labor, can work at your own pace, and can ensure every spot is insulated to your satisfaction.
- Cons of DIY: It can be time-consuming and physically uncomfortable work. Mistakes like compressing insulation or leaving gaps can reduce effectiveness. You might not achieve the same neatness or thorough air-sealing as a professional.
Professional Installation
Hiring a professional insulation contractor is often the preferred choice for certain materials and situations.
- When to Hire a Pro: Professional installation is highly advisable, and often necessary, for spray foam insulation. The equipment and technique required for proper application are not DIY-friendly, and correct spraying is critical for performance and safety. Blowing insulation into finished walls is another scenario where pros have the tools to do it with minimal wall damage and ensure even filling.
- Expertise and Efficiency: Professionals bring expertise and can often complete the job much faster than a DIYer, sometimes in a day or two compared to several weekends. They can advise on the correct R-values for your climate and identify any underlying issues like moisture or pest damage that need addressing first.
- Code Compliance and Permits: Professionals will handle any necessary permits or ensure the work meets local building codes, which is particularly important if your project is part of finishing the space or a garage conversion. They understand requirements like installing vapor barriers or fire-rated coverings.
- Handling Difficult Tasks: Pros are equipped to handle tricky tasks like insulating around wiring, plumbing, or tight spaces. They also take care of safely disposing of old insulation material.
- Cost: Hiring a professional increases the overall cost because you are paying for their labor, overhead, and expertise. However, this expense can be worthwhile to ensure the insulation is installed correctly and performs as expected. For high-end materials like spray foam, the cost of DIY kits is often similar to professional costs for covering an entire garage, with minimal savings and potential quality issues, making professional installation the norm.
- Pros of Professional Install: Ensures proper, code-compliant installation, saves you time and effort, handles complex materials and tasks safely, and takes care of waste disposal.
- Cons of Professional Install: Higher overall insulation cost.
In summary, the choice between DIY and professional installation depends on your skill level, the type of insulation material you choose, your budget, and the complexity of the job. For basic materials in unfinished spaces, DIY can significantly reduce the cost to insulate garage. However, for advanced materials like spray foam or work in finished walls, the expertise and efficiency of a professional are often worth the added expense.
Regional Costs and Energy Benefits: How Location & Climate Affect the Cost to Insulate a Garage
The cost to insulate a garage isn’t uniform across the country. Your geographic location and the local climate play a significant role in both how much you might pay and the potential energy benefits you’ll receive from the project.
Regional Cost Differences
Just like many home improvement projects, the price of insulating a garage can vary depending on where you live.
- Labor Rates: A major factor in regional differences is labor costs. Expect to pay more for professional installation in areas with a higher cost of living, such as large coastal cities in the Northeast or on the West Coast, compared to rural or Southern areas.
- Material Availability: While insulation materials themselves are fairly standardized commodities, the availability of specialized contractors (like those for spray foam) might be more common in regions where demand for high-performance insulation is higher.
- Examples: Some data suggests that insulating a standard two-car detached garage might cost around $1,500–$3,500 in many areas, but could be higher in major metropolitan markets.
- Incentives: It’s also worth checking if your state or local utility company offers any rebates or incentives for insulation upgrades as part of energy efficiency programs. These can help offset the upfront insulation cost.
Climate and R-Value Requirements
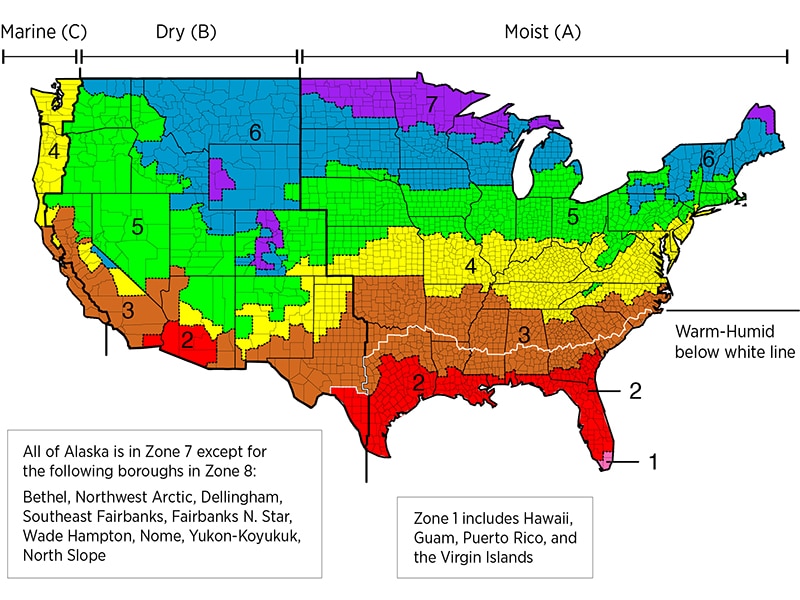
Your local climate directly impacts the recommended R-value for your garage insulation, which in turn affects the amount and type of material needed, and thus the cost.
| Climate Zone | Wall R-Value | Ceiling R-Value | Recommended Materials |
|---|---|---|---|
| Zone 1 (Very Hot) | R-13 | R-30 | Reflective Insulation + Fiberglass Batts |
| Zone 2 (Hot) | R-13 | R-49 | Fiberglass Batts, Radiant Barrier |
| Zone 3 (Warm) | R-13–R-15 | R-49–R-60 | Fiberglass Batts, Blown-In Cellulose |
| Zone 4 (Mixed) | R-15–R-19 | R-60 | Blown-In Cellulose, Fiberglass Batts |
| Zone 5 (Cool) | R-19–R-21 | R-60 | Fiberglass, Cellulose, Spray Foam |
| Zone 6 (Cold) | R-21 | R-60 | Spray Foam, Dense Cellulose, Foam Boards |
| Zone 7 (Very Cold) | R-21+ | R-60+ | Closed-Cell Spray Foam + Blown-In or Batts |
| Zone 8 (Subarctic) | R-21+ | R-60+ | Closed-Cell Spray Foam, High-Density Batts |
- Colder Climates: In colder regions, you will generally need higher R-values to effectively slow heat loss and keep the garage warmer in winter. This means using thicker insulation layers or materials with higher R-value per inch, which increases material costs. For instance, in northern states, it’s recommended to insulate garage ceilings to around R-30 to R-60 and walls to about R-13 to R-21, especially if the garage is attached or heated. Achieving higher R-values requires more material or more expensive, higher-performance materials.
- Warmer Climates: In milder or hotter climates, the focus might shift from preventing heat loss in winter to reducing heat gain in summer. A lower R-value might be acceptable, and materials like reflective insulation (radiant barriers) can be particularly effective in reflecting the sun’s heat. For example, a garage in a hot climate might be fine with R-13 in the walls and R-19 in the ceiling, plus a radiant barrier.
- Conditioned vs. Unconditioned: The recommended R-values also differ if the garage will be actively heated or cooled (conditioned) versus just insulated to buffer the adjacent living space. An attached garage with a room above should have insulation levels similar to your home’s attic. Using adequate R-value for your specific climate zone is crucial for achieving the desired energy savings and comfort.
Energy Efficiency and ROI
Insulating your garage can contribute to your home’s overall energy efficiency, leading to potential savings, though the return on investment (ROI) can vary.
- Attached Garages: Insulating an attached garage can significantly reduce energy loss between the garage and your house. This slows the transfer of heat from your warm house into the cold garage in winter, and from the hot garage into your cool house in summer. This can make adjacent rooms more comfortable and slightly reduce the workload on your heating and cooling systems. Insulating the garage ceiling is especially important if there is living space above.
- Detached or Unheated Garages: For detached garages or those that remain unheated, the direct energy savings on your utility bills may be minimal, as you’re not actively paying to heat or cool that space. However, if you use supplemental heating or cooling in the garage (like for a workshop), insulation will drastically reduce the energy needed to maintain a comfortable temperature.
- Air Sealing: It’s important to remember that insulation works best when combined with air sealing. Many drafts occur through gaps in the garage framing or around the garage door. Materials like spray foam inherently air-seal, but with batts or boards, you should use caulk or expanding foam to seal gaps for maximum efficiency. Weatherstripping the garage door is a low-cost step that is vital for reducing air leakage.
- Typical ROI: The ROI from energy savings alone for an unheated attached garage might take many years to recoup the cost of insulating your garage. If your primary goal is energy savings, insulating other areas of your home (like the main attic) might offer a faster return. However, if you do heat your garage, you could recoup the cost in just a few years through lower heating bills.
- Increased Home Value: An insulated garage can also add value to your home, though it’s not always a dollar-for-dollar return. It can make your home more appealing to buyers who want to use the garage as a workspace or for other purposes. While hard to quantify precisely, it adds functionality and comfort that can be a selling point.
Ultimately, insulating a garage is often seen as an investment in comfort, usability, and protection for stored items first, with energy savings and a potential boost to home value as valuable bonuses. The ROI for your insulation project will depend heavily on how you use your garage and your specific climate.
Cost Breakdown: Estimated Cost to Insulate a Garage by Size and Material
To provide a clearer picture of the potential investment, here are estimated insulation costs for insulating the walls and ceiling of single and double-car garages using different materials. These tables are based on typical scenarios for unfinished garages and are intended for comparison. Actual project costs can vary based on your specific garage dimensions, regional pricing, and installation details.
The tables show the approximate material cost if you choose DIY garage insulation, the estimated labor cost if you hire a professional, and the total cost for a professional installation. Note that these estimates generally exclude costs for adding drywall or other finishes, which would be an additional expense. Also, for attached garages, subtracting the area of the shared wall might reduce the total costs slightly. These figures assume insulating all walls and the ceiling, but not the garage door unless specified separately.
Table 1: Estimated Cost to Insulate a Single-Car Garage
This table provides estimated costs for insulating a single-car garage, assuming approximately 800 sq. ft. of surface area for walls and ceiling.
| Insulation Material | Material (DIY) Cost | Labor (Pro) Cost | Total (Pro) Cost |
| Fiberglass Batts | ~$400 | ~$400 | ~$800 |
| Blown-In Cellulose | ~$500 | ~$600 | ~$1,100 |
| Spray Foam | DIY not recommended | ~$1,500 – $2,000 | ~$3,000 – $3,500 |
| Rigid Foam Boards | ~$700 | ~$700 | ~$1,400 |
| Reflective Insulation | ~$200 | ~$150 | ~$350 |
Table 2: Estimated Cost to Insulate a Double-Car Garage
This table provides estimated costs for insulating a double-car garage, assuming approximately 1,300 sq. ft. of surface area for walls and ceiling.
| Insulation Material | Material (DIY) Cost | Labor (Pro) Cost | Total (Pro) Cost |
| Fiberglass Batts | ~$600 – $700 | ~$700 – $800 | ~$1,400 – $1,500 |
| Blown-In Cellulose | ~$800 | ~$900 | ~$1,700 |
| Spray Foam | DIY not practical | ~$2,500 – $3,000 | ~$5,000 – $6,000 |
| Rigid Foam Boards | ~$1,000 | ~$1,000+ | ~$2,000+ |
| Reflective Insulation | ~$300 | ~$250 | ~$550 |
Notes on the Tables:
- These figures represent mid-range estimates. The actual cost range can be wider. For example, HomeGuide’s range for a 2-car garage is $800–$5,100 depending on material.
- Spray foam insulation costs can vary significantly based on the type (open vs. closed-cell) and required thickness. Full thickness closed-cell can easily exceed $5k in a double garage.
- Reflective insulation is often used in addition to other insulation types, not usually as a standalone solution.
- DIY spray foam kits are generally not cost-effective for insulating an entire garage compared to hiring a professional, and quality may suffer.
- The split between material and labor costs can be roughly 50/50 for many insulation jobs.
- Regional variations can impact the labor component. Expect to pay 10-20% more in high-cost cities. Your climate will also influence whether you need to invest more in thicker or higher R-value insulation.
These tables should give you a general idea of how the size of your garage and your choice of insulation type will affect the total cost of insulating a garage.

Conclusion and Additional Tips for Your Garage Insulation Project
Deciding to insulate your garage is a worthwhile investment that offers multiple benefits, from increased comfort and protection for your belongings to potential energy savings and added home value. Understanding the factors that influence the cost to insulate a garage is crucial for planning and budgeting effectively.
As we’ve explored, the average cost of insulating a garage can vary significantly, typically ranging from $1,900 up to $7,700, with a national average around $4,700. This wide range is primarily driven by the size and type of your garage, the specific insulation material you choose, and whether you hire professionals or opt for DIY garage insulation.
For most homeowners seeking a balance of cost and performance, fiberglass batts or blown-in cellulose are often excellent choices. They can effectively achieve recommended R-values for garage walls (around R-13 to R-15) and ceilings (R-30+ if blown in) without the higher expense of materials like spray foam. However, if you have specific needs, such as creating a climate-controlled workshop in a cold area, investing in higher-performance options like spray foam insulation might provide better long-term comfort and energy savings.
Regardless of the insulation type you select, addressing any necessary prep work before insulating is essential. This includes fixing leaks or water issues, adding weatherstripping to doors, and considering ventilation.
Insulation performs best in a dry, sealed environment; tackling moisture problems or large air gaps beforehand will ensure you get the full benefit of your insulation investment. Insulating the garage door (or upgrading to an insulated door) and sealing gaps can significantly improve the overall result of insulating a garage.
It’s also helpful to temper your expectations regarding the immediate return on investment (ROI) solely from energy savings, especially if your garage is unheated. While insulating an attached garage can slightly reduce energy bills by limiting heat transfer to the house, it’s typically not a quick money-saving upgrade on its own.
Some sources point out that if you don’t pay to heat the garage, energy savings alone might take years or decades to pay back the insulation cost. Consider it part of a broader home efficiency and improvement plan.
The true value of insulating a garage often lies in the added functionality and comfort it provides. An insulated garage can transform a drafty, uncomfortable space into a usable extension of your home for hobbies, a gym, or storing temperature-sensitive items. That added utility, along with the potential resale perks of having a well-insulated garage, often justifies the overall cost in the long run.
In conclusion, while determining exactly how much it costs to insulate a garage involves considering several variables, the benefits of improved comfort, protection, and potential energy savings make it a project worth exploring. Gather quotes from local professionals and consider your specific needs and budget to make the best decision for your home.