Wiring a garage door opener might seem like a daunting task, but it’s a crucial part of setting up a reliable garage door system. Whether you’re tackling a new garage door installation or replacing an old opener, understanding how to properly connect the low-voltage wires is essential for safe operation. A correctly wired opener ensures your safety sensors function, your wall control operates, and your entire garage door system works seamlessly.
This guide will walk you through everything you need to know about connecting the various components of your garage door opener. We’ll cover safety precautions, the necessary tools, how to handle the wiring itself, and troubleshooting common issues. While some electrical work requires a professional contractor, wiring the low-voltage accessories like the wall button and safety sensors is often a manageable DIY project for many homeowners.
By the end of this step-by-step guide, you’ll have the knowledge to confidently wire your garage door opener, ensuring your door opens and closes safely and reliably every time. Let’s get started on connecting the wires for a smooth installation.
Safety First: Essential Precautions Before You Start Wiring
✅ Safety Checklist Before Wiring
Working with any electrical component, even low-voltage ones, requires careful attention to safety. Your garage door system involves electrical connections that, if mishandled, could pose a risk. Taking essential precautions is not just recommended; it’s absolutely crucial for safe operation and your personal well-being during the wiring process.
The single most important step before you touch any wire or terminal is to turn off power to the garage door opener. Do this at your home’s main electrical panel, often located in the basement, garage, or utility closet. Find the breaker that controls the power outlet your opener is plugged into, or the specific circuit for the garage lights and outlets, and switch it off.
It’s a good practice to test the outlet or the opener itself after flipping the breaker to ensure the power is truly off. Use a non-contact voltage tester to confirm that no electrical current is present at the opener’s motor unit or the outlet. Don’t rely solely on the opener being unresponsive; always test the power source directly.
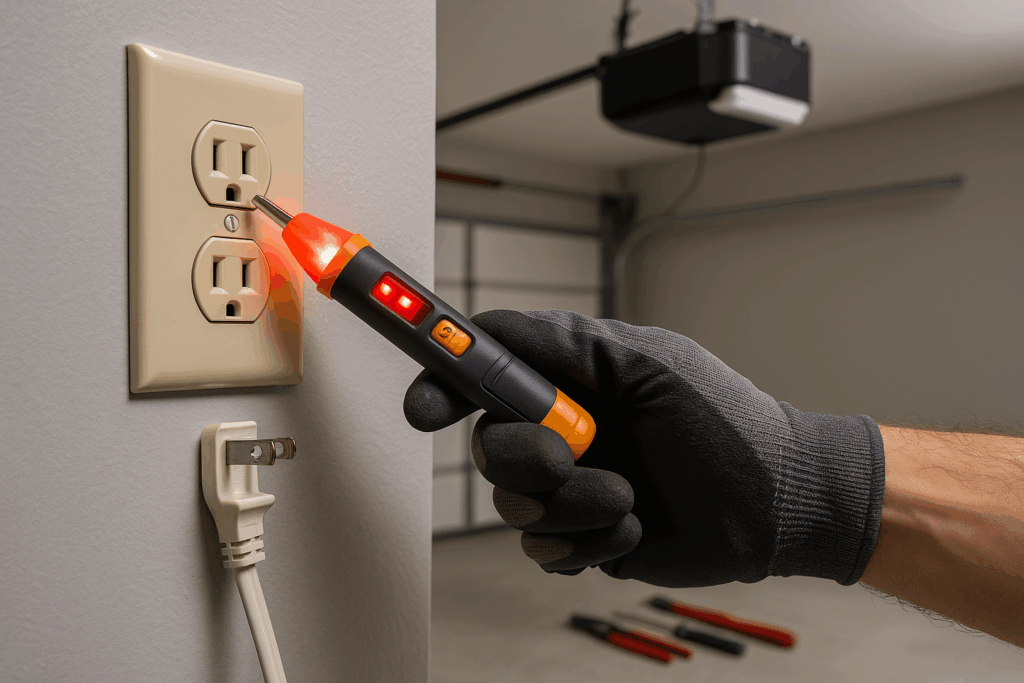
While most of the wiring you’ll be doing for the safety sensors and wall control is low-voltage, typically 18-22 gauge wire carrying minimal current, the motor unit itself is connected to standard household electrical power. This is why disconnecting the power at the breaker is non-negotiable. Never attempt to wire anything on the opener motor unit until you have confirmed the power is off.
Always refer to the specific manufacturer’s instructions included with your garage door opener. Different brands like Chamberlain or Craftsman may have slightly different wiring terminal layouts or specific requirements.
If you don’t have your manual in hand, a quick Google search of the brand and model of your garage door opener can help you find it online. We have an extensive list of LiftMaster Garage Door Opener Manuals and Craftsman manuals available on our site. If those are the brand of garage door opener, you’ll likely find your opener’s manual somewhere in there.
Following their guide alongside this general tutorial will provide the most accurate and safe installation for your particular opener. Ignoring these initial safety steps could lead to electrical shock or damage to your garage door opener’s motor.
Gather Your Tools and Materials

Before you begin the actual wiring process for your garage door opener, it’s essential to have all the necessary tools and materials ready. Having everything at hand will make the installation smoother and more efficient. Gathering your supplies beforehand also helps you avoid interruptions once you’ve started working.
Here are the essential tools you’ll likely need:
| Tool / Material | Quick Tip |
|---|---|
| 🟠 Wire Strippers | ✅ Use one with a built-in cutter for clean, accurate wire ends. |
| 🔧 Screwdrivers | ✅ Both Phillips and flathead – check terminal type on your opener. |
| 🗜️ Pliers | ✅ Handy for gripping wires or tightening connectors. |
| ⚡ Voltage Tester | ✅ A non-contact tester is safest for confirming power is off. |
| 📏 Measuring Tape | ✅ Use to measure wire lengths and ensure sensor height (4–6 in). |
| 🔩 Drill (optional) | ✅
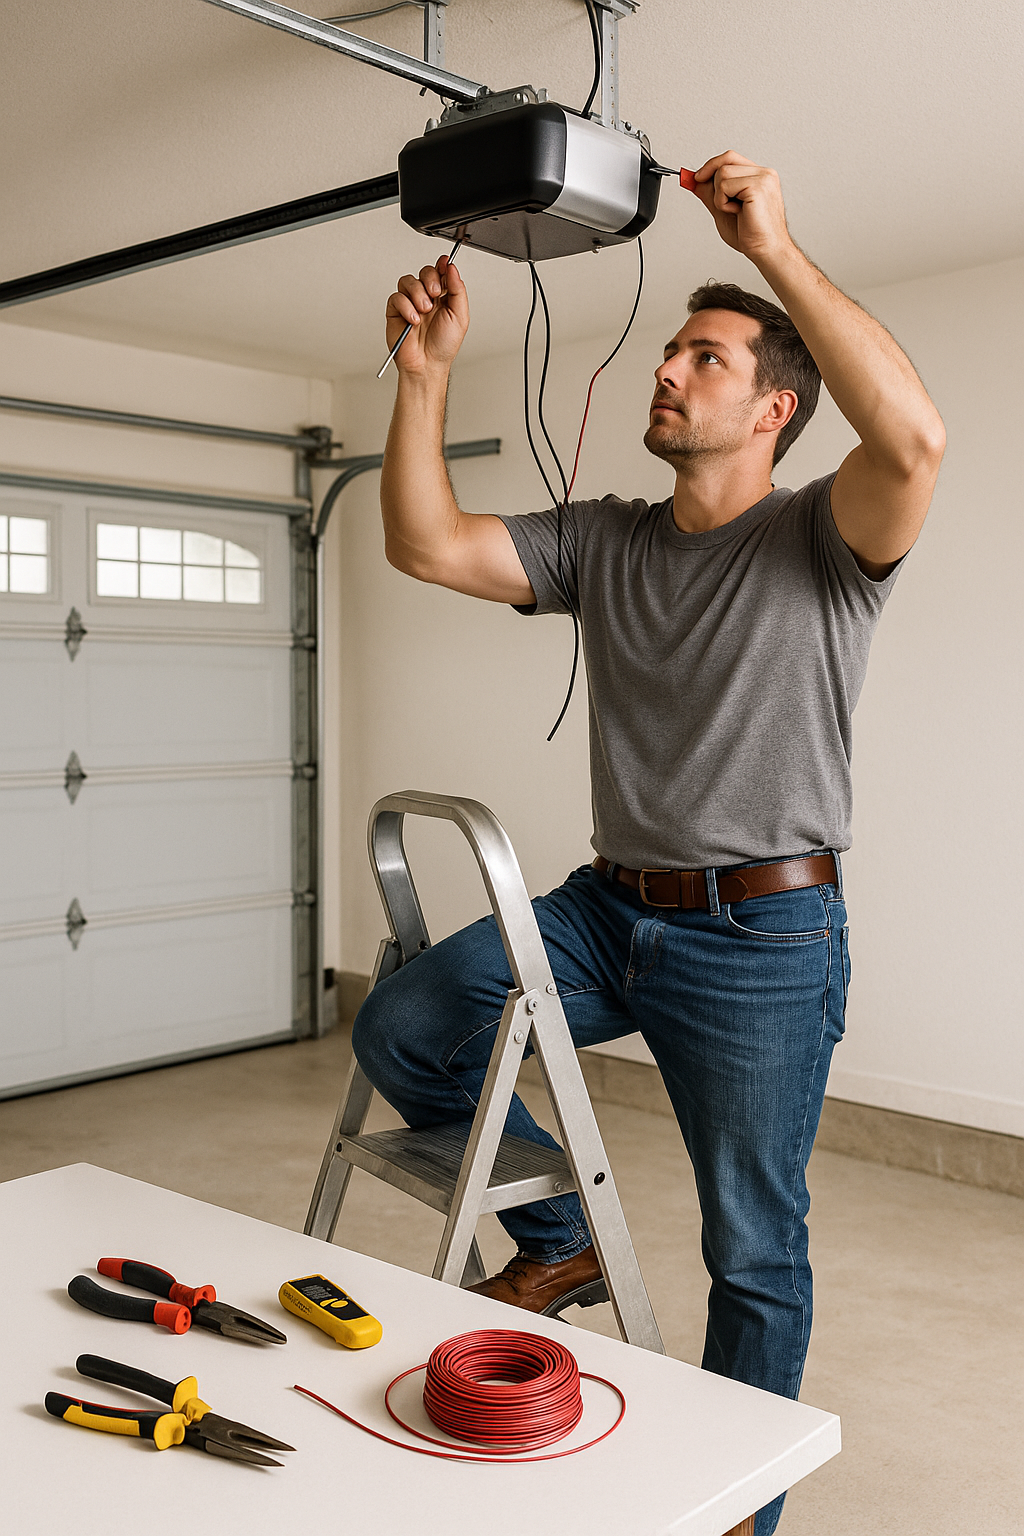
For materials, the primary item is the low-voltage wire itself. This is typically 18 or 22 gauge bell wire, often sold in spools. You’ll need enough to run from the motor unit to your safety sensors on either side of the garage door and to your wall control unit. The wire usually comes as a pair of insulated strands. Check your specific garage door opener manual for the recommended wire type and specification. While bell wire is common, some manufacturers might specify a particular gauge or type. Ensure you have enough wire to complete all the necessary runs; it’s better to have a little extra than to run short. You may also need wire nuts or other small connectors, though often the opener’s terminals accept bare wire directly. Understanding Your Garage Door Opener System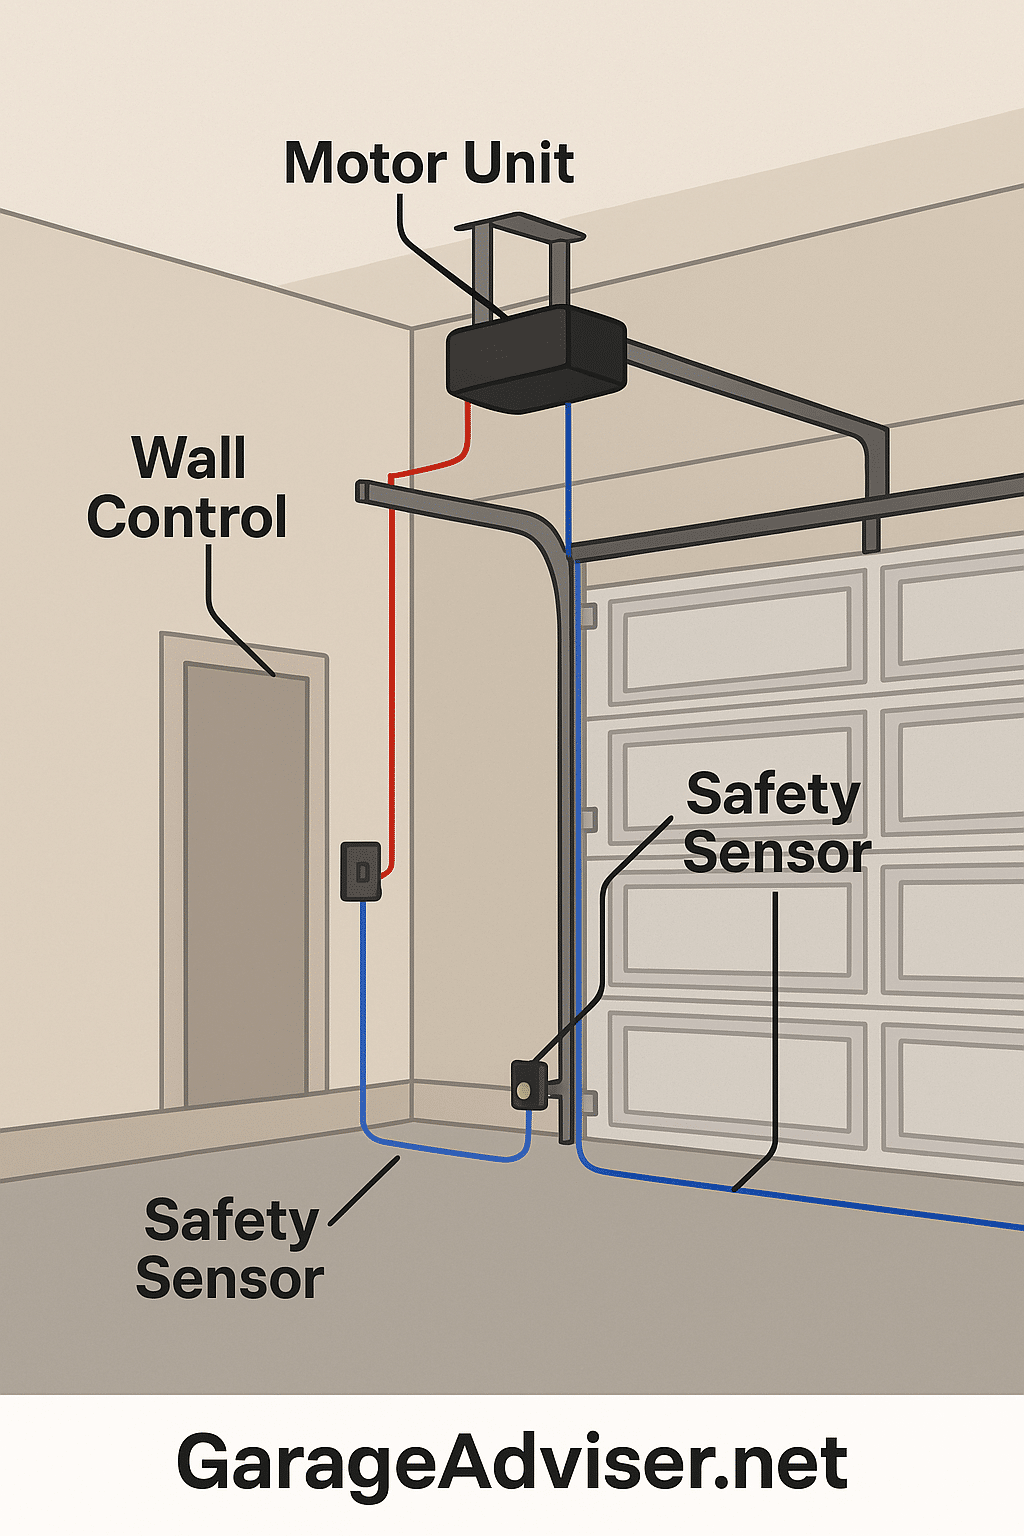 Before you start connecting wires, it helps to understand the basic components that make up your garage door opener system. Knowing what each part does will make the wiring process much clearer. While the entire garage door system works together, the opener itself has several key elements you’ll be dealing with. The main component is the Motor Unit. This is the large box typically mounted to the ceiling in your garage. It contains the motor that raises and lowers the garage door, the circuit board, and the terminals where all the low-voltage wires connect. Think of the motor unit as the brain of the opener system. Next are the Safety Sensors, which are absolutely crucial for safe operation. These are small units installed on either side of the garage door track, near the bottom. They project an invisible beam across the door opening. If this beam is broken by an obstruction while the door is closing, the opener will automatically reverse the door’s movement to prevent injury or damage. These sensors use low-voltage wiring. The Wall Control is typically a push button or sometimes a digital keypad mounted on the wall inside your garage. This is the primary way you open and close the door from inside without a remote. Like the safety sensors, the wall control connects to the motor unit using low-voltage wires. It’s a simple but essential part of interacting with your opener. While there are different types of openers, such as the chain drive or belt drive models, the wiring for the safety sensors and wall control is generally standardized across most modern garage door openers. The differences in drive type relate to how the door is physically moved along the track, not how the low-voltage accessories are wired to the motor unit. Understanding these parts helps ensure you connect the right wires to the correct terminals during your installation. Step-by-Step Guide: Connecting the WiresGarage Door Opener Wiring Flowchart: OverviewStep 1 of 6
Now that you understand the components and have your tools ready, it's time to start the physical process of wiring your garage door opener. This step-by-step guide will walk you through connecting the low-voltage wires from your safety sensors and wall control to the opener's motor unit. Remember to keep the power turned off throughout this entire process until instructed otherwise. Locating the Wiring Terminals on the Motor UnitThe first physical step in connecting the wires is finding where they attach on the opener itself. All low-voltage connections are made at the motor unit, which is the main opener box installed on your garage ceiling. Look for a set of terminals located on the side or back of the motor unit housing. These terminals are specifically designed for the low-voltage wiring. These terminals are usually clearly labeled to indicate where each wire should connect. Common labels you'll see include "SENSOR," "WALL CONTROL," and "COMMON." Your opener might have screw terminals where you wrap the wire around a screw, or push terminals where you simply insert the stripped wire end into a slot. Referencing your opener's wiring diagram is crucial here; it will show the exact layout and labeling for your specific model. The wiring diagram is found in the installation manual that came with your garage door opener. Take a moment to study this diagram to familiarize yourself with which terminal corresponds to the safety sensors, the wall control, and any other accessories you might be installing. Understanding these connection points on the motor unit is the starting point for all the subsequent wiring steps. Wiring the Safety SensorsProperly wiring the safety sensors is arguably the most critical step for the safe operation of your garage door opener. These small devices prevent the door from closing on people, pets, or objects. Each safety sensor typically comes with a length of low-voltage wire attached, or you will connect your own wire to terminals on the sensor itself. The wire usually consists of two insulated strands, sometimes molded together into a single cable. On the back or side of each individual sensor unit, you'll find a couple of small terminals. You'll need to connect the wires from the low-voltage cable to these terminals. While it varies by manufacturer, one wire might connect to a terminal labeled '1' or 'Sensor', and the other to a terminal labeled '2' or 'Common'. Consult the instructions that came specifically with your safety sensor kit for the correct wire-to-terminal mapping at the sensor end. Before making the connection at the sensor, prepare the end of your low-voltage wire. Use your wire strippers to carefully strip about half an inch of insulation from the end of each wire strand. This exposes the bare wire needed to make a secure electrical connection. Ensure no stray wire strands are sticking out after stripping, as they could cause a short circuit. Make the connection firmly to the sensor terminals as specified by the sensor manual. Mounting and Aligning the Safety SensorsOnce the wires are connected to the safety sensors themselves, the next step is their proper physical mounting on either side of the garage door opening. These sensors are designed to be installed on the side of the garage door tracks, typically 4 to 6 inches above the garage floor. This specific height is vital because it's designed to detect young children, pets, or objects low to the ground that might be in the path of the closing door. Use the brackets and hardware provided with your safety sensors to securely attach them to the door tracks or the wall right next to the tracks. Ensure they are firmly in place and won't easily get knocked out of position. The most critical part of this step is aligning the two sensors. They must face each other directly so the invisible infrared beam from the sending sensor can be received by the receiving sensor across the door opening. Many safety sensors have small LED indicator lights on them. These lights are incredibly helpful for confirming proper alignment; they will typically light up steadily when the beam is connected and the sensors are aligned correctly. If the light is off or flickering, the alignment is off, or there's an obstruction. Take the time to carefully adjust both sensors until the indicator lights confirm a strong, steady connection, as this alignment is crucial for safe operation. Running and Connecting the Sensor WiresWith your safety sensors mounted and aligned, the next step is running their sensor wires back to the garage door opener's motor unit located on the ceiling. Carefully route the low-voltage wire from each sensor along the wall or ceiling, following the path of the garage door tracks or other structural elements. Use insulated wire staples or clips to secure the wire neatly along the path and prevent it from dangling or interfering with the door's movement. 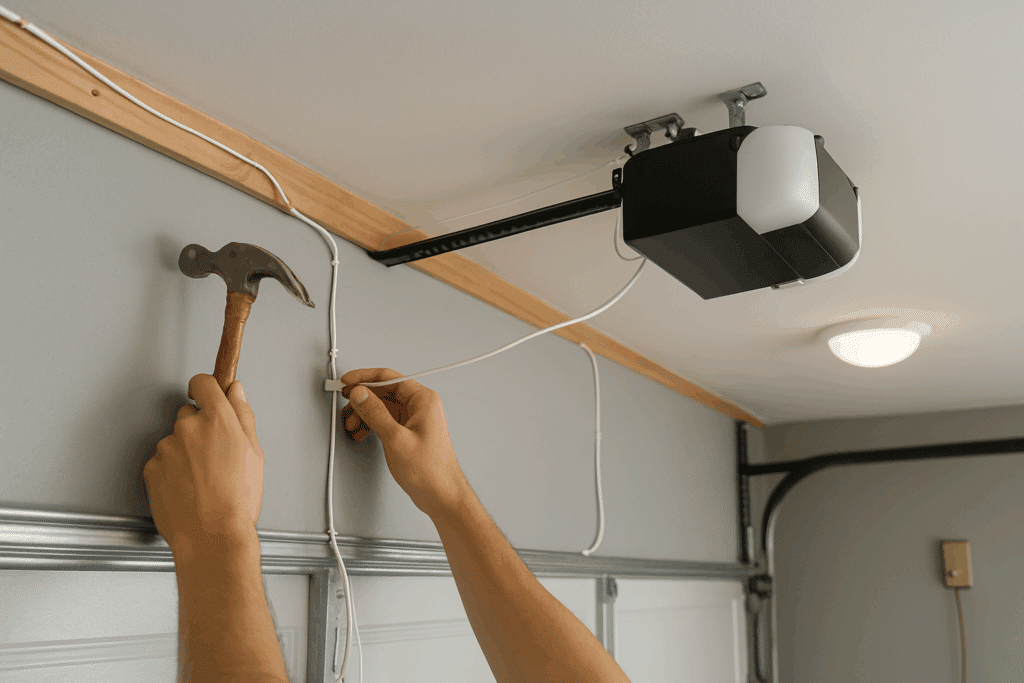 Once the wires from both sensors reach the motor unit, you'll need to prepare their ends for connection. Use your wire strippers to strip about 1/2 inch of insulation from the end of each wire strand at the motor unit location. Again, ensure you have clean, bare wire exposed and no loose strands that could cause issues. Now, you will attach the wires to the designated terminals on the motor unit for the safety sensors. Refer back to your opener's wiring diagram to confirm which terminals are for the sensors. Typically, one wire from each sensor will go to a common terminal (often labeled 'Common'), and the other wire from each sensor will go to the sensor terminal (often labeled 'Sensor' or 'Safety Beam'). You might need to twist the corresponding wires from both sensors together before inserting them into a single terminal if your opener has push terminals or screw terminals designed for multiple wires. Proper wiring ensures the reliability of the safety system. Wiring the Wall Control (Push Button)The wall control is your standard push button located inside the garage, offering a convenient way to operate your garage door opener without a remote. The wiring for the wall control is usually simpler than the safety sensors, typically requiring just a single run of two-strand low-voltage wire back to the motor unit. This wire allows the button to send a signal to the opener to initiate the door's movement. On the back of the wall control unit itself, you will find two terminals. These terminals are where you connect the two individual wires from your low-voltage cable. It usually doesn't matter which wire connects to which terminal on the wall button, as it's a simple circuit closure, but always check the wall control's specific instructions just in case. Prepare the end of the low-voltage wire that will connect to the wall control. Use your wire strippers to strip about half an inch of insulation from each of the two wire strands. Neatly twist the bare wire ends to prevent fraying. Connect these stripped ends securely to the terminals on the back of the wall control unit, ensuring a good connection so the button can reliably connect to the opener. Connecting the Wall Control Wire to the Motor UnitOnce the low-voltage wire is securely attached to the wall control unit, you need to run the other end of that wire back to the garage door opener's motor unit. Similar to the sensor wires, route the wall control wire neatly along the wall and ceiling, using insulated staples or clips to secure it in place. Plan your route to be as direct and unobtrusive as possible, keeping it away from the door's moving parts. When the wall control wire reaches the motor unit, prepare its ends for connection. Use your wire strippers to carefully strip about half an inch of insulation from the end of each of the two wire strands. Twist the exposed bare wire ends tightly to make them easier to insert into the terminals and ensure a good connection. Now it's time to attach the wires to the appropriate terminals on the motor unit for the wall control. Consult your opener's wiring diagram once more to identify these specific terminals. They are usually labeled "WALL CONTROL" or similar. Insert the stripped wire ends into the correct terminals and secure them according to your opener's terminal type (tighten screws or ensure they are fully inserted into push terminals). A solid connection here is key for your wall button to reliably communicate with the opener. Wiring Other Accessories (Keypad, etc.)Beyond the essential safety sensors and wall control, you might have other accessories for your garage door opener that require wiring. A common example is an external keypad mounted outside your garage door, allowing entry using a code. Other accessories could include multi-function wall consoles with extra features or integration components. The process for wiring these additional accessories is generally similar to connecting the wall control or sensors. They typically use low-voltage wiring and connect to specific designated terminals on your opener's motor unit. However, the exact terminal locations and wiring configurations will vary significantly depending on the type of accessory and your specific opener model. It is absolutely essential to consult the installation instructions that came with the specific accessory you are wiring. These instructions will detail which terminals on the accessory to use and which terminals on the opener's motor unit they should connect to. Always cross-reference with your main garage door opener manual's wiring diagram to ensure you are using the correct connection points on the motor unit. Double-Check All Wire ConnectionsBefore you restore power to your garage door opener, it is absolutely critical to double-check all wire connections you've made. This step might seem simple, but ensuring every connection is secure and correct is vital for both safety and the proper function of your garage door system. Taking a few extra minutes here can prevent troubleshooting issues later. Go back to each connection point: the terminals on the motor unit, the terminals on both safety sensors, the terminals on the wall control, and any terminals on other accessories you wired. Visually inspect where you attach the wires. Make sure each wire is fully inserted into its designated terminal slot or securely wrapped around its screw terminal. Check that the insulation is stripped back just enough to allow the bare wire to make contact with the terminal, but not so much that excess bare wire is exposed outside the terminal housing. Ensure no stray wire strand from one terminal is accidentally touching a neighboring terminal, which could cause a short circuit. Confirm that the correct wire (e.g., sensor wire) is connected to the correct labeled terminal (e.g., SENSOR) on the motor unit, referencing your wiring diagram one last time. Proper wiring ensures the long-term reliability of your opener. Testing Your Newly Wired Garage Door OpenerAfter completing all the wiring and carefully checking every connection, the moment of truth arrives: testing your newly wired garage door opener. Before putting the opener into full operation, you need to perform a few simple tests to ensure everything is connected correctly and, most importantly, that the safety features are working as intended. The very first step is to restore power to the garage door system. Go back to your electrical panel and flip the breaker that controls the opener's circuit back to the 'On' position. You should hear a click from the motor unit, and its lights (if any) might turn on, indicating it has power. Now, you must test the safety sensors. This is the most critical test. Place an object, like a cardboard box or a broomstick, in the path of the closing door, right between the two sensors on the side of the garage door. Use your wall control or remote to try and close the door. The door should either immediately stop its descent and reverse, or refuse to close at all while the obstruction is present. If the door closes despite the obstruction, DO NOT use the opener and proceed to the troubleshooting section immediately – the sensors are not working correctly, and this is a serious safety hazard. If the safety sensors pass the test, clear the obstruction and test the other control methods. Use the wall control button to open the door. Ensure the door travels smoothly all the way up. Then, use the wall control again to close the door. Test your remote control as well, making sure it reliably triggers the opener to raise and lower the door. Pay attention to the door's movement during these tests; it should operate smoothly without hesitation or unusual noises. Troubleshooting Common Wiring Problems📊 Troubleshooting Decision Tree: Why Isn't My Garage Door Opener Working?Even with careful attention to the step-by-step guide, sometimes a newly wired garage door opener might not function perfectly. Don't worry; many common issues after wiring are related to simple connection problems or sensor alignment. This troubleshooting section covers the most frequent glitches you might encounter.
 For more specific issues or error codes, always consult your garage door opener's user manual. It usually has a detailed troubleshooting section that can help pinpoint the exact cause of the problem. If you've re-checked all wiring connections and sensor alignment and the issue persists, it might indicate a problem with the opener's circuit board or the sensors themselves, which may require repair or replacement. Sometimes, despite your best DIY efforts, you might need extra help. If you're unable to resolve the issue after troubleshooting, don't hesitate to seek professional help. An expert garage door contractor has the tools and experience to quickly diagnose and fix problems that aren't immediately obvious, ensuring your garage door system is safe and fully operational. When to Call a Professional Garage Door ContractorWhile wiring the low-voltage components of a garage door opener can be a rewarding DIY project, it's important to recognize when a task exceeds your comfort level or expertise. There are certain situations where calling a professional garage door contractor is the safest and most efficient course of action. Don't hesitate to seek professional help if needed. Here are some signs that it might be time to contact an expert garage door service:
Ultimately, if you have any doubt about the safety or correctness of your garage door needs or the repair process, contacting a qualified professional garage door contractor is the smartest decision. They have the experience, tools, and knowledge to ensure your entire garage door system is installed and operating correctly and safely. FAQs About Wiring Garage Door OpenersHere are some frequently asked questions (FAQs) about the process of wiring a garage door opener, addressing common concerns and providing quick answers. Getting these connections right is a key part of a successful DIY project, but it's normal to have questions. How many wires are typically needed for garage door opener safety sensors? Safety sensors usually require a pair of low-voltage wires for each sensor unit, running back to the motor unit. This means you'll run two cables (one from each side), each containing two insulated wire strands, for a total of three wires (one common, one for each sensor's signal) connecting to the sensor terminals on the motor unit. The wire itself is generally a 2-strand low-voltage cable. Can I use any type of wire to connect my garage door opener sensors? No, you should not use just any type of wire. You must use low-voltage bell wire of the gauge recommended by your manufacturer, typically 18 or 22 gauge. Using the incorrect cable size or type can prevent the sensors from working correctly, which compromises the crucial for safe operation of your opener. Always check your manual for the specific specification. Where do the safety sensor wires connect on the garage door opener motor unit? The sensor wires connect to specific low-voltage terminals on the motor unit. These terminals are usually clearly labeled, often as "SENSOR" or similar. You will typically connect one wire from each sensor to a common terminal and the other wire from each sensor to the dedicated sensor terminal. Refer to your opener's wiring diagram for the exact location and labeling. Why is proper wiring crucial for safe operation? Proper wiring ensures that all safety features, especially the safety sensors, function correctly. If wires are loose, crossed, or connected incorrectly, the sensors might not detect an obstruction, meaning the door could close on someone or something. This makes correct wiring fundamental to the crucial for safe operation of the entire garage door system. Is wiring a garage door opener a difficult DIY project? Wiring the low-voltage components (sensors, wall control) is generally considered an easy installation for someone comfortable with basic tools and following instructions. The most important part is safely turning off power and correctly identifying terminals using the manual and wiring diagram. If you are uncomfortable or encounter issues after troubleshooting, seeking professional help is always recommended. Conclusion: Enjoy Your Properly Wired Garage Door OpenerSuccessfully wiring your garage door opener is a significant step in setting up your complete garage door system. By carefully following the steps – from prioritizing safety and turning off the power, to meticulously connecting the wires for the safety sensors and wall control, and finally testing the system – you've ensured that your opener is ready for safe and reliable operation. Remember that referencing your specific garage door opener's manual and wiring diagram is paramount throughout the installation process. These resources provide details unique to your model, helping guarantee that every wire is connected to the correct terminal. Taking the time to double-check all your connections contributes significantly to the long-term reliability and seamless operation of your opener. While wiring a garage door opener accessories like sensors and wall controls is often a manageable DIY task (easy installation), there's no shame in calling for assistance. If you encountered difficulties during troubleshooting or simply feel more comfortable with an expert handling electrical connections or complex repairs, seeking professional help from a qualified expert garage door contractor is always recommended. Your safety and the proper function of your garage door are the top priorities. With your garage door opener now correctly wired and tested, you can enjoy the convenience and peace of mind that comes with a fully operational and safe entry system for your home. |