Craftsman has remained one of the top garage door opener brands for a very long time. They have been consistent in providing the latest features and technologies in their openers, and this has kept them very relevant in the garage door industry.
Craftsman garage door openers, just like any other garage door opener on the market, can have problems. Most of these problems can be fixed with some troubleshooting steps, and in this post, you are going to learn how to troubleshoot a craftsman garage door opener.
Craftsman openers are self-diagnostic. This means they can detect the reason why it is not working, and then gives you a diagnostic signal. This is indicated with the Diagnostic LED found on the garage door opener. On the newer models, the diagnostic code is indicated by the Up and Down Arrows on the garage door opener. The number of times the LED blinks tells you the troubleshooting steps you need to perform. Now let’s get into it.

Garage door opener not working
If your Craftsman garage door opener is not working at all, there won’t be any signal to tell you that. If you tried operating the garage door opener from both the remote control and the door control and the opener did not activate. Here are the troubleshooting steps
Check the power supply.
The first thing you want to check is the socket your Craftsman opener is connected to. If the garage door opener is not powered up, it won’t work. So, get a ladder and place it under the opener. Unplug the garage door opener from the socket-outlet, and plug in another device. This is to verify if the socket works.
The next thing to check is your home’s circuit breaker or fuse. Check if the garage’s fuse is in good condition or the circuit breaker has not tripped open.
Garage door won’t close, Light Flashes
When the garage door does not close, and the lights flashes, it means the problem is with the safety sensor. There are a few things which can cause this. With the diagnostic feature on Craftsman, you can know what exactly the issue is. The table below shows how to identify the issue with the diagnostic code.
| Older Models | Newer Models (UP – DOWN) | Problem |
|---|---|---|
| 1 blink | 1 – 1 | Sensors are Misaligned |
| 2 blinks | 1 – 2 | Sensors are not installed, disconnected or wires are cut |
| 3 blinks | 1 – 4 | Sensor wires are shorted |
Here are the steps to troubleshooting a safety sensor issue
Check for obstruction
Check if there is anything in the way of the garage door. If there is something in the doorway, the safety sensor will detect it and prevent the garage door from closing. This is exactly the reason why they are installed: to prevent accidents.
So, verify if there is something in the way of the door. It could be a suitcase or some items you took off your car’s trunk and forgot to take them.
Align safety sensors
The next thing to do is to make sure the safety sensors are aligned. As you may already know, there are two sensors, one on each side of the door. They are supposed to face each other every time. One sender known as the sending sensor emits an infrared signal, and the other sensor, which is, the receiving sensor receives that signal
The sensor with the yellow LED is the sending sensor, and the receiving sensor has a green LED. When the sensors are properly aligned, the green LED will turn and stay on. So check if the green LED is on. If that’s not the case, then adjust it till the LED turn and stay on.
Check the safety sensor’s connection to the garage door opener.
If the Diagnostic LED on your Craftsman garage door opener blinked two times, then it means the safety sensor is disconnected from the garage door opener. To troubleshoot this, first, check if any of the safety sensor wires have been disconnected behind your Craftsman opener. Also, verify that the wires are properly connected to the safety sensors as well.
Also, inspect the sensor cable for any signs of damage. A damaged cable may be the reason why there is short-circuit. If the cable is damaged, then you need to have it replaced.
Remote control not working.
When your craftsman garage door remote is not working, here are the troubleshooting steps to fixing this issue:
- Verify the lock feature is not activated: If the lock feature on your Craftsman’s wall control is activated, it won’t accept any remote control’s command until it’s deactivated. So the first thing to do is to check and make sure that it’s not activated
- Check the remote battery: All garage door opener remotes use batteries, and batteries eventually die out after using it for a while. If you own a Craftsman garage door remote with an LED, then you are in luck. To check if the remote battery is not dead. When the LED turns on, then the battery is good. If it doesn’t, then you need to replace the battery.
- Operate the garage door with the door control: Operating your Craftsman garage door opener with the door control is a way to confirm that the problem is actually from your remote. If the garage door opener works when you use the door control, the problem might be with the remote. If it doesn’t work, then check the Diagnostic LED to know what the problem is
- Reprogram the remote: The next thing to do is to reprogram. Here is a guide on how to reprogram your Craftsman remotes with your opener. See here
Garage door reverses after fully closing
All craftsman garage door openers are equipped with a reversing feature. This is a safety feature that prevents accidents and also protects the opener from damage. When the garage door opener is first installed, it is programmed to learn the fully open and fully closed position, and then it stores it in memory.
When the garage door is closing, and it doesn’t reach the fully closed position, it assumes there is an obstruction in the way, and then it reverses. This helps protect objects that may not have been detected by the safety sensors.
Here are the troubleshooting steps to follow when your Craftsman garage door opener reverses after fully closing
Check for obstruction
First, check if there is something in the way of the door. Safety sensors are mounted six inches off the ground. This means it can’t detect items that are shorter than six inches. So check if there is any item at the doorway and remove it.
Adjust Travel Limit
Travel limit is a setting used to set the distance the garage door has to travel to fully open or close. When the limit is set too high, that is what causes the garage door to reverse. When it reaches the floor, your craftsman garage door opener assumes it hasn’t reached the fully closed position but has rather hit an obstacle. That’s because it didn’t get to the distance you have set. I hope that makes sense.
Older Craftsman opener models have analog travel adjustment dials, and newer models have electronic Problem Buttons that is used to adjust the travel. We will take a look at how to adjust the travel adjustment for both types.
For newer Craftsman garage door opener models with Programming buttons, here is how to adjust the travel limits:
- Locate the Programming Buttons on your garage door opener. They are either at the back or the sides of the device, based on the opener model.
- Press the Adjustment Button until the UP button begins to flash and/or a beep is heard
- Press and hold the UP button till the garage door is in the fully opened position
- Press the Adjustment Button to confirm. The garage door opener light will flash twice, and the DOWN button will begin to flash
- Press and hold the DOWN button till the garage door reaches the fully closed position
- Press the Adjustment Button to confirm once again. The opener lights will flash twice, and the UP button will begin to flash again.
- Press and release the UP button. The door will move up to the fully opened position, and the DOWN button will begin to flash
- Press and release the DOWN button. The door will travel down to the fully closed position.
Travel Limit has been adjusted successfully. Now you can close your garage door to verify if it doesn’t reverse. It is advised to perform the safety reversing test after the adjustment is complete.
As I mentioned earlier, older Craftsman garage door opener models have analog travel adjustment dials. There are two of them: the Up Travel and the Down Travel dial. The Up Travel is for setting how far the garage door opens, and the Down Travel dial is for setting the distance the door travels down to fully close.
In our situation, we have to reduce Down Travel, so that the garage door does not reverse when it reaches the floor. Here is how to do that
- Locate the travel adjustment dials on the garage door opener. They are either at the back or the sides.
- Turn the down travel adjustment dial counterclockwise, about 1/4 of a full turn.
- Close the garage door. If the garage door reverses, repeat step 2 and 3.
At this point, you have to tweak the down travel adjustment dial till the garage door fully closes without reversing.
Perform the safety reversing test after adjusting the travel limit. To do this,
- Place a 2 x 4 piece of wood under the garage door.
- Close the garage door. When the door hits the wood, it should reverse, else re-adjust the down travel limit.
Garage Door Opens or Closes Halfway
If your Craftsman garage door opener opens or closes halfway and then stops, here are the troubleshooting steps to follow.
Check for binding or sticking of the garage door.
When the garage door tracks or rollers are damaged, or the garage door is not balanced, your Craftsman opener will stop when opening. That’s because to overcome such problems, the garage door opener will operate excessively, which can damage overheat and damage the motor. So here’s how to check if the garage door parts are not damaged, and it’s properly balanced.
- Disconnect your Craftsman opener from the door by pulling the emergency pull cord.
- Lift the garage door manually. If the door is balanced, it will be very easy to lift, even with one hand
- Pay attention to the areas where the door binds or sticks. Inspect the tracks at the areas where the door sticks. Check for dents or any damage.
- Repair the damaged part if you can, or call a garage door technician
To reconnect the garage door opener back to the door, activate it. It should connect automatically.
Adjust the Travel Limit
If there was no problem with the garage door when you checked it manually, and you are still having the problems, then you need to increase the travel limit. That’s because when the garage door stops halfway, the systems think it has fully opened or closed, which is not the case.
We have already discussed why and how to do that in another section of this troubleshooting guide. Click here to scroll to that section.
Adjust the Force Settings
Conditions of the garage door tracks and rollers change over time. They may not necessarily be damaged, but these changes can affect the smooth operation of the door. Small things like dampness and corrosion account for these changes.
When this happens, you need to increase the Force of the garage door opener to compensate for these changes. The Force of a garage door opener is the power required to lift or drop the garage door. When you increase the Force, you are basically giving more power to the garage door opener to push or pull the garage door.
Newer Craftsman garage door opener models with electronic Programming Buttons automatically sets the Force while you are adjusting the travel limits. So, once you set the travel limits, the Force will be adjusted accordingly.
However, for older models, there are two dedicated force adjustment dials for dialing in the right Force for your Craftsman opener. One is for the Open Force, and the other is for the Close Force. In our situation, we want to increase the Force, so the garage door closes fully. Here is how to do that
- Locate the Force Adjustment dials. They can be found at the back panel of your Craftsman garage door opener
- To increase the Open Force, turn the Open Force dial about 1/4 of a full turn
- Similarly, to increase the Close Force, turn the Close Force about 1/4 of a full turn
- Operate your garage door opener. If the garage door fully opens or closes, you are done. Else repeat the process once again.
You have to keep adjusting till the garage door opens or closes fully without reversing. It is important to perform the safety reversing test after adjusting the force settings.
Replace RPM Sensor
If you tried all the troubleshooting methods outlined, and your garage door opener still opens halfway, then the RPM sensor is faulty.
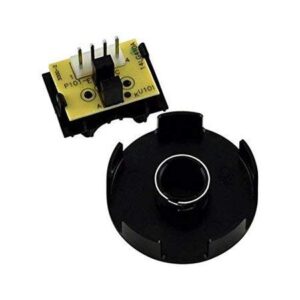
What is the RPM sensor? It is, essentially, a sensor that detects the speed of the motor. If your garage door moves about 6-8 inches and the Diagnostic LED flashes five times, then your sensor is faulty, and you need to have it replaced.

This may look like a daunting task for most people. So call a garage door technician if you are not good with repairs. However, if you are an avid DIY’er, this will be a simple project to do, and it will take less than 60 minutes to finish.
Craftsman’s 41C4398A RPM Sensor (on Amazon) is the perfect replacement for a faulty RPM sensor. It is made by the Chamberlain Group and is used in all of their garage door openers, including Craftsman, Liftmaster, and Chamberlain. After you get the brand-new RPM sensor, follow this guide on how to replace it.
Wall Control not working
When your Craftsman opener’s wall control is having a problem, the Diagnostic LED will blink three times. Also, the LED on the wall control will be off. On the newer models, the UP arrow button flashes once, and the down arrow flashes three times. This means there is a short circuit in the wall control wire connection, or the wall control is faulty.
To troubleshoot this issue.
- Remove the wall control from the wall, and disconnect the wires from the back. You will need a screwdriver for this
- Touch the bare ends of the wire together to see if the garage door activates. If the garage door opener works, it means the wires are in good condition, but the wall control is faulty, and you need to replace it with a new one. If the opener does not work, perform the next steps
- Disconnect the wall control wire from your Craftsman opener.
- Cut a 3-inch strand of insulated wire and peel the ends. You will use it as a jumper wire in the next step
- Insert the jumper wire into the wall control terminals on the garage door opener to see if the garage door moves. If the garage door opener works with the jumper wire, then there is a break in the wall control wiring, and you have to replace it.

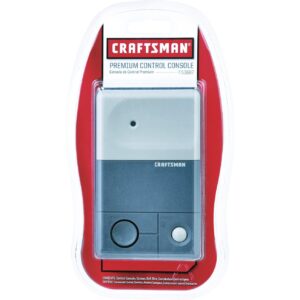
Craftsman’s Premium Wall-Control Console (on Amazon) is an excellent replacement for your damaged wall console. This was made by Craftsman, and not a third party, so compatibility won’t be an issue with this device. It has an adjustable timer for setting when you want the lights to go off after opening or closing the garage door. It also has a dedicated light switch for turning on and off the lights without operating the garage door.

If your wiring was damaged, you need to have it replaced, and this Universal Garage Door Wire (on Amazon) is an excellent wire for the job. It’s about 90 feet long, which is more than enough for the entire wiring without having to join wires. It simply gets the job done.
The garage door opener is overheating or humming.
When your Craftsman garage door opener is overheating or hums and doesn’t move, it’s a sign that there is a problem with the garage door’s mechanism or the motor is overheated. This problem is confirmed with the Diagnostic LED flashing five times, or with the error code, 1-5 on newer devices, which means the UP arrow blinks once, and the DOWN arrow blinks five times.
To troubleshoot this, disconnect the garage door opener from the door by pulling the emergency cord, and manually lift the garage door. Check for binding or obstruction, such as a broken spring or a door lock. Correct as needed
If this doesn’t solve the problem, then unplug your Craftsman garage door opener and wait for about 30 minutes to retry. This will give the motor ample time to cool down.
Garage Door Opener Beeping
There is no problem with your Craftsman opener when it’s beeping. It is an alert that an unattended door is closing from a garage door monitor such as AssureLink, Internet Gateway, or Timer-to-Close.
Recommend Posts
Which Garage Door Remote Should You Buy? 3 Things to Consider
Liftmaster vs Genie Garage Door Openers: Which is Better?
Wayne Dalton Garage Door Opener Troubleshooting – Step by Step Guide
Linear Garage Door Opener Troubleshooting – Step by Step Guide
Troubleshooting Chamberlain Garage Door Opener – Complete Guide
