
Struggling to find space in your garage? Overhead storage might be the perfect solution. Imagine lifting all that clutter off the floor, creating room for your car, tools, and more. It’s simpler than you think! This article will guide you through easy and efficient DIY overhead garage storage ideas. Say goodbye to chaos and hello to a neat, organized garage.
Key Takeaways:
- Discover practical DIY overhead storage solutions.
- Learn step-by-step instructions for installation.
- Find tips for maximizing your garage space.
- Gain insights into choosing the right materials and tools.
- Get inspired by creative storage ideas to keep your garage tidy.
Overhead storage offers numerous benefits:
- Maximizes vertical space: By using the ceiling, you free up valuable floor area.
- Improves safety: Keeps items off the floor, reducing tripping hazards.
- Protects belongings: Elevates items away from potential water damage or pests.
- Increases accessibility: With proper planning, items can be easily retrieved when needed.
In this comprehensive guide, we’ll explore a variety of DIY overhead garage storage ideas that can transform your cluttered garage into an organized oasis. From simple suspended shelves to more complex pulley systems, we’ll cover options suitable for every skill level and budget.
Understanding Your Garage Space
Before diving into DIY projects, it’s crucial to assess your garage’s potential for overhead storage. This step ensures that your chosen storage solution will fit your space and meet your needs.
Assessing Your Garage for Overhead Storage Potential
- Measuring available ceiling space: Start by measuring the height of your garage from floor to ceiling. Most residential garages have ceilings between 8 and 10 feet high. Measure the length and width of the area you’re considering for overhead storage as well.
- Identifying structural support: Locate the ceiling joists or trusses. These are the structural elements that will support your overhead storage. In most garages, joists run perpendicular to the roof line and are spaced 16 or 24 inches apart. You can find them using a stud finder or by tapping the ceiling and listening for a solid sound.
- Considering garage door clearance: Measure the highest point your garage door reaches when open. You’ll need to ensure your storage system doesn’t interfere with the door’s operation. Generally, allow at least 2-3 inches of clearance between the storage and the highest point of the door.
- Evaluating lighting and electrical fixtures: Take note of any existing light fixtures, electrical outlets, or other ceiling-mounted items. You’ll need to work around these or consider relocating them if necessary.
Here’s a simple table to help you record your measurements:
| Measurement | Value |
|---|---|
| Ceiling Height | |
| Available Length | |
| Available Width | |
| Joist Spacing | |
| Garage Door Clearance |
By thoroughly assessing your space, you’ll be better equipped to choose and implement the right DIY overhead garage storage ideas for your specific situation. Remember, proper planning is the foundation of any successful DIY project, especially when it comes to overhead storage where safety is paramount.
Planning Your DIY Overhead Garage Storage Project
With a clear understanding of your garage space, it’s time to plan your DIY overhead storage project. Proper planning ensures a smooth execution and helps you avoid costly mistakes or safety hazards.
A. Setting a Budget
Before you start, it’s crucial to establish a realistic budget for your project. DIY overhead garage storage can range from very affordable to quite expensive, depending on the materials and complexity of the system you choose. Here’s a general breakdown of potential costs:
- Low-end: $50-$200 (Basic shelving using 2x4s and plywood)
- Mid-range: $200-$500 (More complex systems with metal components)
- High-end: $500+ (Custom solutions or heavy-duty commercial-grade systems)
Remember to factor in the cost of tools if you don’t already own them. It’s often more cost-effective to buy tools than to rent them for extended periods.
B. Choosing the Right Storage System for Your Needs
Consider the following factors when selecting your storage system:
- Weight capacity: Determine how much weight you need to store overhead. This will influence your choice of materials and construction method.
- Accessibility: How often will you need to access the stored items? This affects whether you choose fixed shelves or a more dynamic system like pulleys.
- Item sizes: The dimensions of your stored items will dictate the size and spacing of your storage units.
- Aesthetics: While functionality is key, you may also want to consider how the storage system will look in your garage.
C. Gathering Necessary Tools and Materials
Here’s a list of common tools and materials you might need for a DIY overhead garage storage project:
Tools:
- Drill and drill bits
- Circular saw or miter saw
- Stud finder
- Level
- Tape measure
- Screwdriver
- Wrench set
- Safety glasses and dust mask
Materials:
- Lumber (2x4s, 2x6s, or plywood depending on your design)
- Screws (deck screws and lag bolts)
- Brackets or hangers
- Paint or sealant (optional)
Pro Tip: Always buy about 10% more materials than you think you’ll need to account for mistakes or unexpected issues.
D. Safety Considerations for DIY Overhead Storage Projects
Safety should be your top priority when installing overhead storage. Here are some key safety considerations:
- Weight limits: Ensure your storage system can safely hold the weight of your items. A good rule of thumb is to design for at least 1.5 times the expected weight.
- Proper anchoring: Always anchor into ceiling joists or trusses, never just the drywall.
- Use of safety equipment: Wear safety glasses, a dust mask, and sturdy shoes during installation.
- Ladder safety: Use a sturdy ladder and have someone spot you when working overhead.
- Electrical awareness: Be mindful of electrical wires that may be hidden in the ceiling.
By carefully planning your DIY overhead garage storage project, you set yourself up for success. Remember, the time spent in preparation often saves double that time in execution. In the next section, we’ll dive into specific DIY overhead garage storage ideas to inspire your project.
10 DIY Overhead Garage Storage Ideas
Now that we’ve covered the planning phase, let’s explore some creative and practical DIY overhead garage storage solutions. These ideas range from simple weekend projects to more complex builds, offering options for every skill level and storage need.
1. Suspended Shelving Units

Suspended shelves are one of the most straightforward and cost-effective overhead storage solutions. Here’s a basic guide:
- Measure and cut 2x4s to create a frame that fits your desired shelf size.
- Attach the frame to the ceiling joists using lag bolts.
- Cut plywood to fit the frame and secure it with screws.
- Add additional support brackets if needed for heavier loads.
Pro Tip: Paint or seal your shelves to protect them from moisture and make them easier to clean.
2. Ceiling-Mounted Racks

Ceiling-mounted racks offer flexibility and are great for storing long items like ladders or lumber.
- Purchase adjustable ceiling rack brackets from a hardware store.
- Locate and mark ceiling joists.
- Attach brackets to joists with lag bolts.
- Insert metal or wooden bars into the brackets.
Safety Note: Ensure the rack is rated for the weight you plan to store.
3. Pulley-Operated Platforms

Pulley systems are ideal for items you need to access regularly but want to store overhead.
- Build a sturdy platform using 2x4s and plywood.
- Install heavy-duty pulleys in the ceiling joists.
- Attach strong rope or cable to the platform corners.
- Thread the ropes through the pulleys and secure with a locking mechanism.
Tip: Use a counterweight system for easier lifting of heavy loads.
4. Overhead Sliding Storage Systems

Sliding systems maximize space utilization by allowing you to access items from the side.
- Install parallel tracks on the ceiling, anchored to joists.
- Build or purchase storage bins that fit the tracks.
- Attach wheels to the bins that match the track system.
- Slide bins into place on the tracks.
Advantage: This system allows you to use the entire depth of your garage for storage.
5. Ceiling-Mounted Bike Racks

Storing bikes overhead frees up significant floor space.
- Purchase or build J-hooks or specialized bike hooks.
- Locate ceiling joists and mark hook positions.
- Drill pilot holes and securely attach hooks to joists.
- Hang bikes by their wheels, alternating direction for efficient use of space.
Safety Tip: Ensure hooks are rated for the weight of your bikes and are deeply secured into the joists.
These first five ideas offer a range of options for different storage needs and skill levels. In the next section, we’ll explore five more innovative DIY overhead garage storage solutions to help you maximize your space.
Let’s continue with the remaining five DIY overhead garage storage ideas:
6. Overhead Pegboard Storage
Pegboards are incredibly versatile and can be adapted for overhead use.
- Cut pegboard to fit between ceiling joists.
- Create a frame using 1×2 furring strips to provide space behind the pegboard.
- Secure the frame and pegboard to the ceiling joists.
- Use pegboard hooks and accessories to hang items.
Bonus Tip: Paint the pegboard to match your garage decor or use a bright color to make items easy to spot.
7. Ceiling-Mounted Storage Bins

This system is perfect for organizing smaller items like holiday decorations or seasonal clothing.
- Build or purchase plastic storage bins with lids.
- Construct a wooden frame that fits the bin dimensions.
- Attach the frame to ceiling joists using lag bolts.
- Slide bins into the frame, securing them with the lids.
Organization Hack: Use clear bins and label them for easy identification of contents.
8. Overhead Kayak or Canoe Storage

Storing large items like kayaks requires a specialized approach.
- Install heavy-duty J-hooks or pulleys in ceiling joists.
- For J-hooks: Hang kayak directly on padded hooks.
- For pulley system: Attach straps to kayak and thread through pulleys.
- Use a locking mechanism to secure kayak in raised position.
Safety First: Ensure your ceiling can support the weight of your watercraft.
9. Loft-Style Overhead Storage Area

For garages with high ceilings, a loft-style storage area can significantly increase storage capacity.
- Build a sturdy frame using 2x4s or 2x6s, anchored to wall studs and ceiling joists.
- Add cross-bracing for additional support.
- Install plywood flooring on the frame.
- Add a ladder or pull-down stairs for access.
Building Code Note: Check local regulations regarding loft additions in garages.
10. Retractable Overhead Storage Units
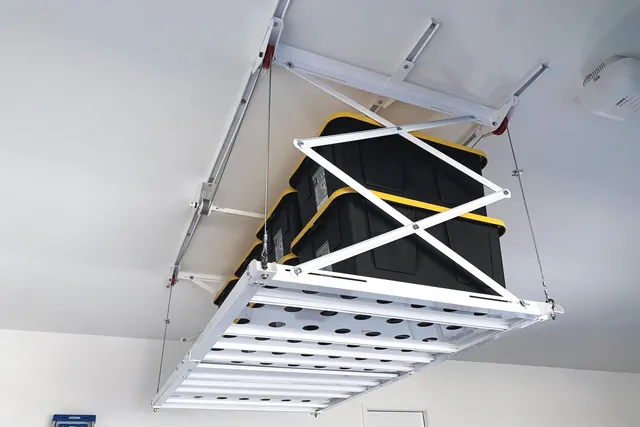
This advanced project combines the benefits of overhead storage with easy accessibility.
- Build a sturdy storage platform.
- Install a track system on the ceiling.
- Attach the platform to the track using a pulley or winch mechanism.
- Add a motor for effortless raising and lowering (optional).
Pro Tip: Include a locking mechanism to secure the unit when raised.
Comparison Table of DIY Overhead Garage Storage Ideas
To help you choose the best option for your needs, here’s a comparison of the ten ideas we’ve discussed:
| Storage Idea | Difficulty | Cost | Weight Capacity | Accessibility |
|---|---|---|---|---|
| Suspended Shelves | Easy | Low | Medium | Moderate |
| Ceiling-Mounted Racks | Easy | Low | High | Good |
| Pulley Platforms | Moderate | Medium | High | Excellent |
| Sliding Systems | Moderate | Medium | Medium | Good |
| Bike Racks | Easy | Low | Low | Good |
| Pegboard Storage | Easy | Low | Low | Moderate |
| Storage Bins | Easy | Low | Low | Good |
| Kayak/Canoe Storage | Moderate | Low | Medium | Moderate |
| Loft-Style Area | Difficult | High | Very High | Good |
| Retractable Units | Difficult | High | High | Excellent |
By exploring these diverse DIY overhead garage storage ideas, you can find a solution that fits your specific needs, budget, and skill level. Remember, the key to successful overhead storage is careful planning, proper installation, and regular maintenance to ensure safety and longevity.
Tips for Maximizing Your Overhead Storage
Optimizing Your DIY Overhead Garage Storage System
Now that you’ve built your overhead storage, it’s time to make the most of it. Proper organization and smart usage can significantly increase the efficiency and effectiveness of your new storage space.
A. Organizing Items by Weight and Frequency of Use
- Weight Distribution:
- Place heavier items closer to the support points (where the shelf attaches to joists).
- Distribute weight evenly across the shelf to prevent sagging.
- Frequency of Use:
- Store less frequently used items (like holiday decorations) towards the back or in harder-to-reach areas.
- Keep more frequently accessed items near the front or edges for easier retrieval.
Pro Tip: Create a simple diagram or list of what’s stored where to save time when searching for items.
B. Using Clear Storage Bins for Visibility
Clear storage bins are a game-changer for overhead storage:
- They allow you to see contents without removing the bin.
- Stackable bins maximize vertical space.
- Uniform bin sizes create a neat, organized appearance.
Recommended Bin Sizes:
- Large (20-30 gallon): For bulky items like sports equipment or camping gear
- Medium (10-20 gallon): Ideal for seasonal clothing or decorations
- Small (5-10 gallon): Perfect for tools, small electronics, or craft supplies
C. Labeling Systems for Easy Identification
Implement a robust labeling system:
- Color-Coding: Assign colors to different categories (e.g., blue for winter items, green for gardening tools).
- Label Makers: Create clear, uniform labels for each bin or section.
- QR Codes: For tech-savvy organizers, QR codes can link to detailed inventories.
Labeling Best Practices:
- Use large, easy-to-read fonts
- Include both category and specific contents
- Consider adding expiration dates for seasonal items
D. Incorporating Lighting Solutions
Good lighting is crucial for usability:
- LED Strip Lights: Attach these under the shelves for even illumination.
- Battery-Operated Puck Lights: Easy to install and ideal for specific areas.
- Motion-Sensor Lights: Convenient for hands-free operation when accessing storage.
Energy-Saving Tip: Use LED lights for energy efficiency and longer lifespan.
Overhead Storage Organization Chart
| Category | Storage Method | Labeling Technique | Location on Shelf |
|---|---|---|---|
| Holiday Decor | Large Clear Bins | Color-Coded + Season | Back/Corner |
| Camping Gear | Duffel Bags or Large Bins | Icon + Text | Middle |
| Sports Equipment | Open Shelving or Hooks | Equipment Type | Front Edge |
| Tools | Small Clear Bins or Toolboxes | Tool Category | Front, Easy Access |
| Seasonal Clothing | Vacuum-Sealed Bags in Bins | Season + Year | Middle to Back |
Additional Optimization Tips:
- Vertical Dividers: Use tension rods or plywood dividers to create vertical sections on your shelf, preventing items from shifting.
- Sliding Systems: For longer shelves, consider adding a sliding track system to access items at the back more easily.
- Inventory List: Maintain a digital or physical inventory of stored items, updating it regularly.
- Seasonal Rotation: Schedule bi-annual reorganizations to rotate seasonal items for easier access.
- Weight Tags: Attach small tags indicating weight to heavier items as a quick reference for safe handling.
By implementing these organization strategies, you’ll transform your DIY overhead garage storage from a simple space-saver into an efficient, user-friendly system. Remember, the key to successful storage is not just creating space, but making that space work for you. In the next section, we’ll discuss important safety considerations to keep in mind as you use your new overhead storage.
Conclusion
DIY overhead garage storage is an excellent solution for maximizing space and improving organization in your home. By following the steps and guidelines outlined in this comprehensive guide, you can create a safe, efficient, and customized storage system that meets your specific needs.
Let’s recap the key points we’ve covered:
- Planning is crucial: Proper measurement, design, and material selection set the foundation for a successful project.
- Safety is paramount: From installation to daily use, prioritizing safety ensures the longevity of your storage and the well-being of your household.
- Customization is key: Tailor your storage solution to your unique needs and garage layout for optimal functionality.
- Maintenance matters: Regular upkeep and inspections prevent issues and extend the life of your storage system.
- Cost-effectiveness: While DIY can save money, consider the time investment and your skill level when deciding between DIY and professional installation.
Remember, a well-executed overhead garage storage project not only clears floor space but can also add value to your home. Whether you’re storing seasonal decorations, rarely used tools, or outdoor gear, an overhead system keeps items accessible yet out of the way.
As you embark on your DIY overhead garage storage project, stay patient, follow safety guidelines, and don’t hesitate to seek help when needed. The result will be a more organized, spacious garage that enhances your home’s functionality and your quality of life.
Frequently Asked Questions About DIY Overhead Garage Storage
To address common concerns and queries, here are answers to some frequently asked questions about DIY overhead garage storage:
Q1: How much weight can overhead garage storage hold?
The weight capacity of overhead garage storage varies depending on the construction method, materials used, and the number of attachment points to ceiling joists. Typically, a well-constructed 4’x8′ overhead storage unit can safely hold between 300-600 pounds when properly installed. However, it’s crucial to:
- Always check the specific weight limits of your materials and design
- Distribute weight evenly across the storage area
- Stay well below the maximum weight capacity for safety (aim for 75% or less of the total capacity)
Q2: Do I need a permit to install overhead garage storage?
In most cases, installing overhead garage storage doesn’t require a permit as it’s considered a minor home improvement project. However, regulations can vary by location. It’s always best to:
- Check with your local building department or homeowners association
- Inquire about any specific requirements or restrictions
- Ensure your installation doesn’t interfere with existing electrical, plumbing, or HVAC systems
Q3: Can I install overhead storage in a garage with a low ceiling?
Yes, but with some considerations:
- Measure the highest point of your garage door when open and ensure at least 2-3 inches of clearance above this point
- Consider using a shallower storage design to maximize headroom
- Look into options like pulley systems or fold-down storage for easier access in low-ceiling garages
For garages with ceilings lower than 8 feet, professional consultation might be beneficial to explore safe and effective storage solutions.
Q4: How do I know if my garage ceiling can support overhead storage?
To determine if your garage ceiling can support overhead storage:
- Identify the ceiling structure (joists, trusses, etc.)
- Locate solid wood joists or trusses for attachment points
- Ensure joists are in good condition without signs of damage or decay
- Consider the age and overall condition of your garage
If you’re unsure about the structural integrity of your ceiling, it’s best to consult with a structural engineer or professional garage storage installer for an assessment.
Q5: What’s the best material for DIY overhead garage storage?
The best materials depend on your specific needs, but common choices include:
- Plywood: Sturdy and cost-effective for shelving
- 2×4 lumber: Excellent for framing and support
- Metal brackets and hardware: For secure attachment and reinforcement
For the shelving surface:
- 3/4″ plywood is typically sufficient for most storage needs
- Consider moisture-resistant or treated wood in humid climates
Pro Tip: Always opt for high-quality materials and hardware to ensure the safety and longevity of your storage system.
By addressing these common questions, we hope to provide clarity and confidence as you plan your DIY overhead garage storage project. Remember, when in doubt, it’s always wise to consult with professionals or experienced DIYers for guidance tailored to your specific situation.